Files
This section of your Transformation Center project hosts all input elements and configuration required to make your transformation a success.
General
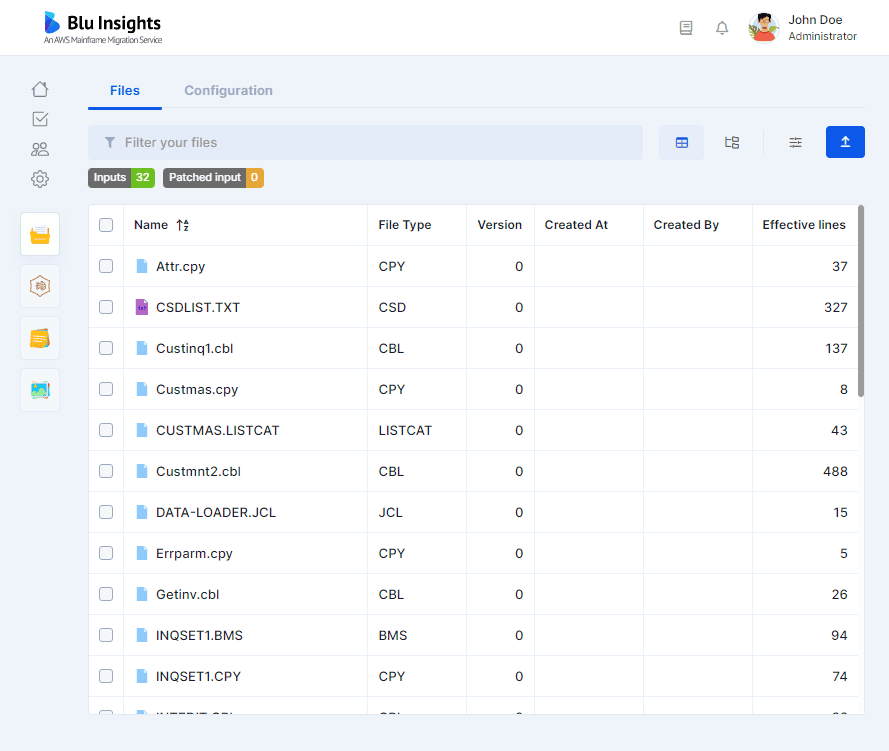
On this section, you will find all the elements which will be considered as the input legacy elements for your transformation. These files are, after the Transformation Center project is created, an exact replicate of the ones in the associated Codebase project you provided. You will be able to filter and view these files the same way you can in the File Inputs section of the Codebase project, but it is not possible to delete them here.
This section proposes two different views:
- Files View: All files are listed at the same level.
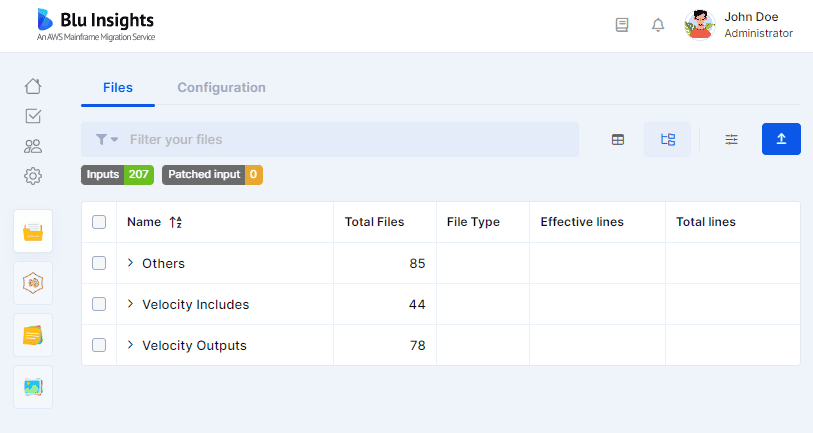
- Velocity View: The Velocity view organizes files according to their Velocity type.
Velocity output: a source code file for which the transformation will produce outputs (e.g. Cobol, BMS, RPG…).
Velocity include: a source code file for which the transformation will not produce an output (e.g. Copybooks), rather it will be included in a Velocity output file.
File versioning
One of the key features of the Transformation Center project is its ability to modify your inputs, if needed, before launching a transformation on them.
The versioning system can be compared to a VCS system : modify a file, add a description explaining the reason behind this modification, save the modification, view modifications and revert/remove them if needed.
Create a version
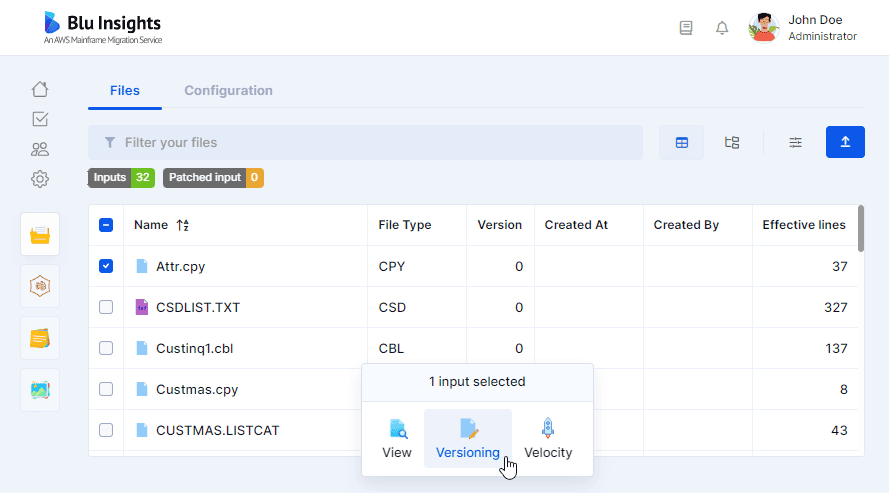
You can start versioning a file by selecting it in the table and click on “Versioning”.
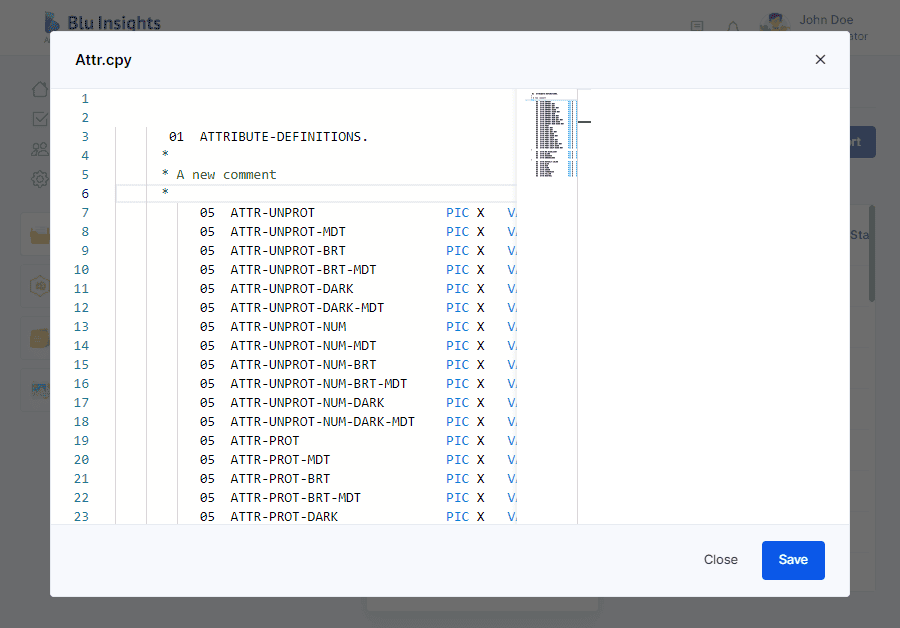
Once clicked, an editor will appear with the content of your file, and you will be able to modify it as you want.
When you are done with your modifications, you can click on the “Save” button, which will display a comparison viewer between your modified version and the original one, as well as a text area where you will be able to provide a message explaining the modification.
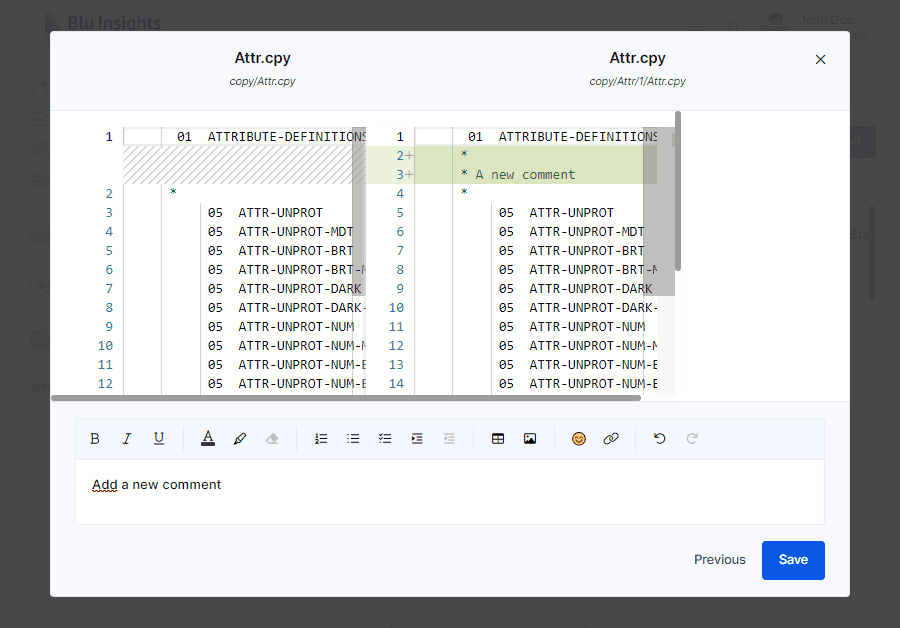
When all is correct, you can click on the “Save” button.
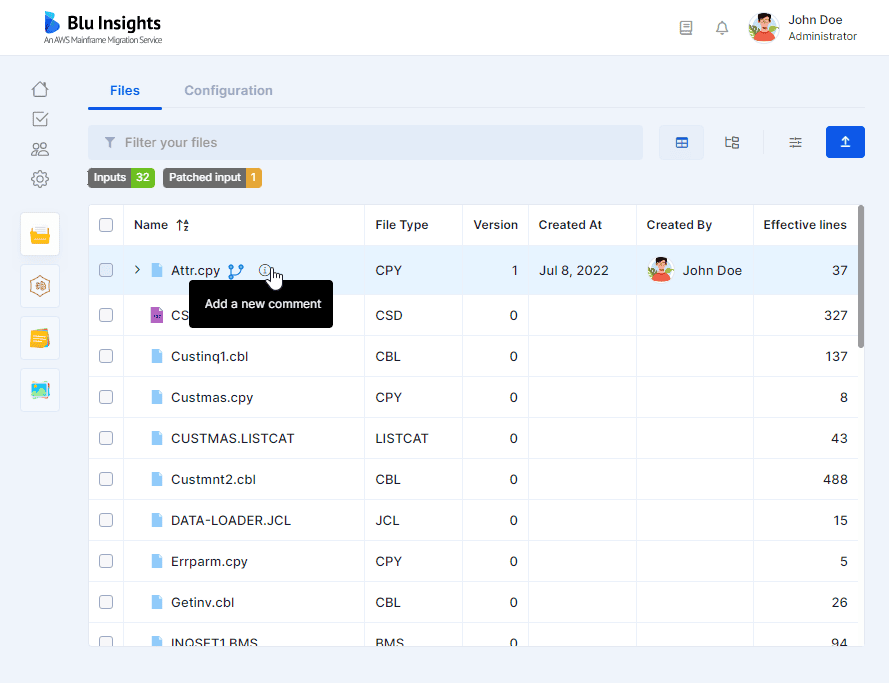
On the Files section, the patched version of your input is displayed as the parent of a tree, and your original content as its child. The “Version” column allows you to detect the different versions of a file, and the “i” tooltip next to the file name allows you to read the message corresponding to a specific version of an input. You can also find some information about the date and author of this version.
You can add as many versions of an input as you want.
Bulk import versions
This feature is useful when you want to quickly modify multiple inputs without the need to follow the previous steps on all of them.
To import a new version for multiple inputs, start by clicking the “import” button.
A popup will be displayed asking you to upload a zip or a 7z file. The contents of this archive must contain the files you want to modify, and each of them must follow the same hierarchy as it was in the Codebase project. This popup also asks you to provide a message for the modification, which will be used as the message for the new version for all of these modified inputs. Once your choice is submitted, a summary will be displayed containing the details of the import. Confirm your action using the “add” button, then the new versions will be available in the table.
Compare versions
Comparing versions of an input is a useful feature to better understand the origin and impact of your modifications, by checking where in the file those modifications have occurred.
To compare different versions of an input, select two versions of the same file, then click on “Compare”. A comparison viewer will be displayed with the highlighted modified contents.

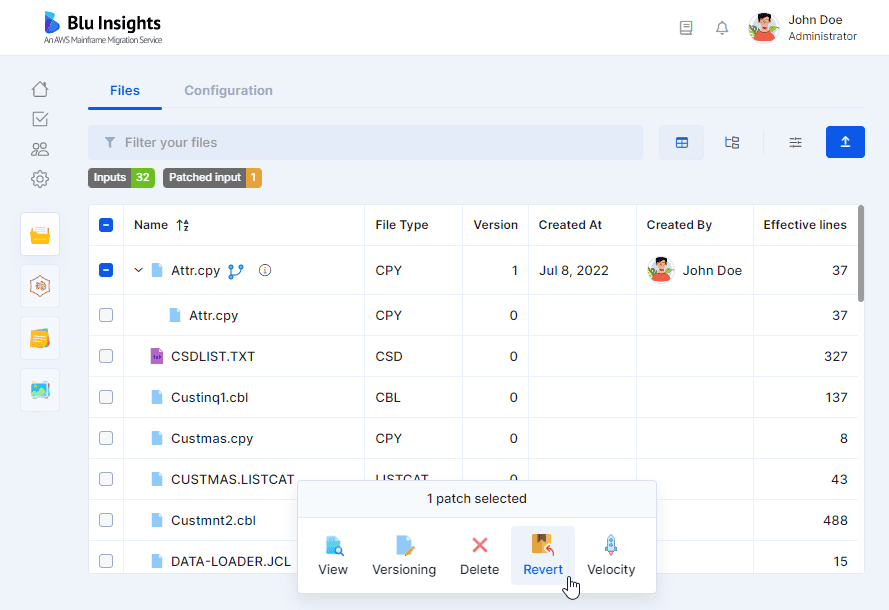
Revert/remove versions
You may need to remove a version of an input that you previously created, for instance when the modification is no longer needed.
In order to do so, select a version of an input, then click on “Delete”. A confirmation popup will be displayed, asking if you are sure about your choice. If so, the version will be deleted from the table.
In the same spirit, you may also want to revert all versions to only keep the original version of a file.
In order to do so, select the latest version of a file, or all versions of a file, then click on “Revert”. A confirmation popup will be displayed, asking if you are sure about your choice. If so, all modifications will be deleted from the table, leaving only the original file with a version 0.
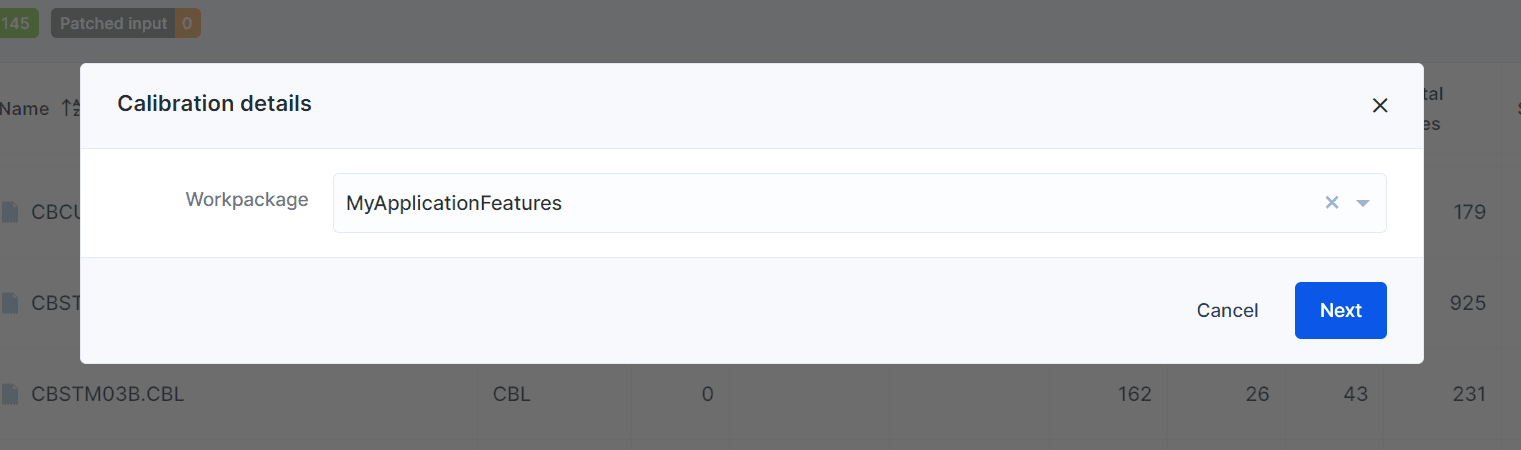
Calibrate
A calibration run can be launched by clicking on the Calibrate button. The calibration run is a non-billed transformation run.
The calibration run can be launched by first choosing a parent workpackage, which will in turn use all the children's workpackages and their respective files to be transformed. The parent workpackage should only contain workpackages as children, not loose files. Additionally, each subsequent child workpackage must adhere to the same rule or only have files as children. After selecting a workpackage, you can change the name of the calibration run, and select the velocity version of the run, with the dropdown listing all the available Velocity versions.
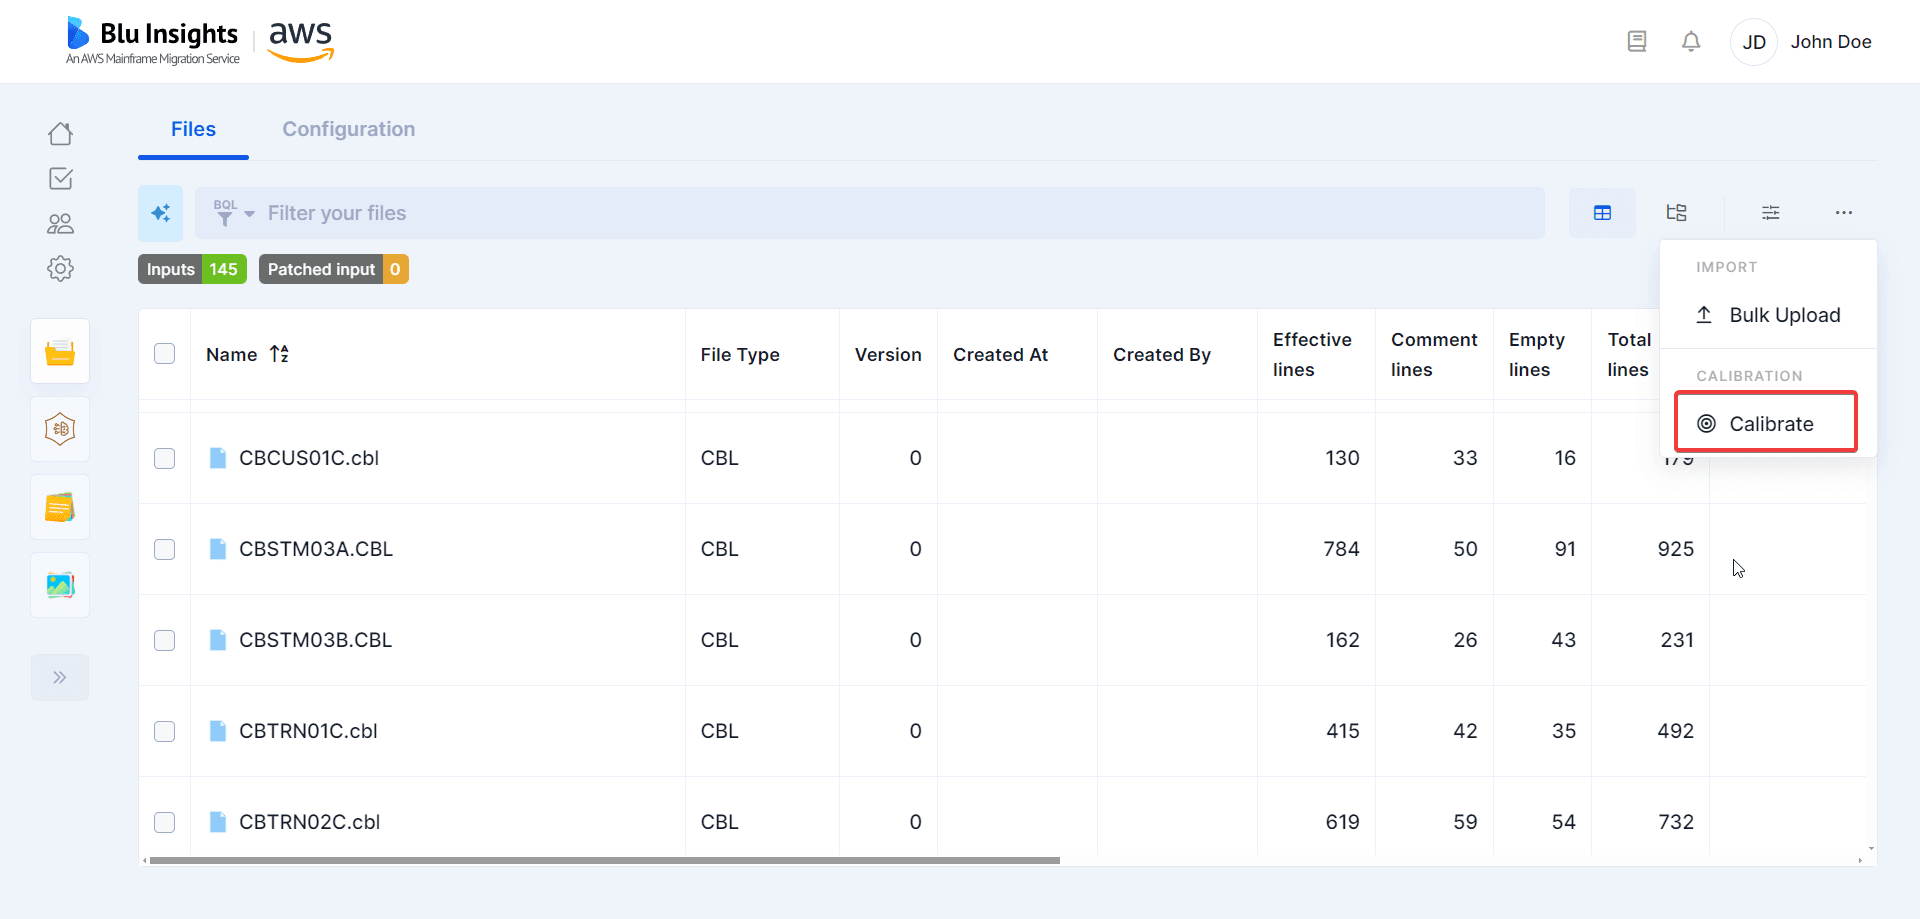
This calibration run is used to compute metrics for each file in the workpackages, i.e. code patterns, which are all the statements that compose a DSL file.
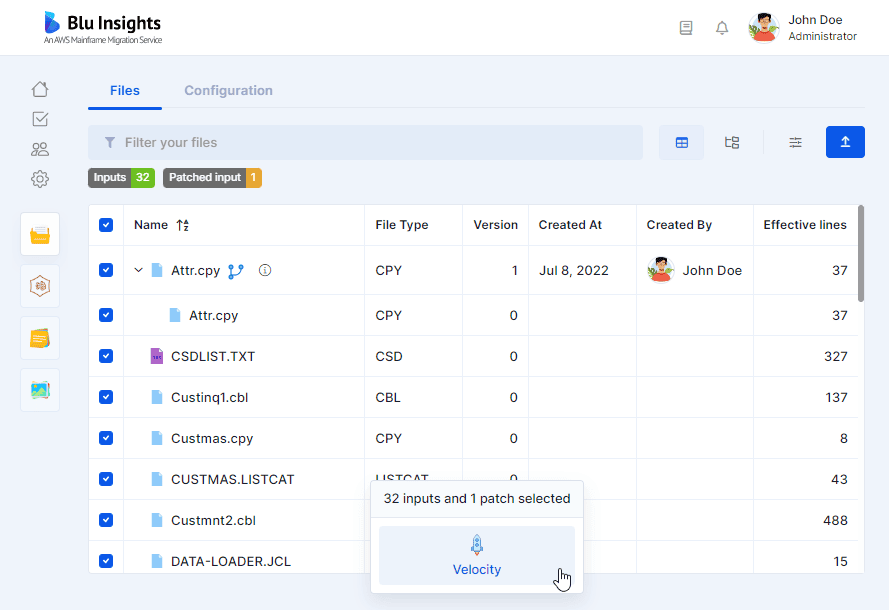
Launch Runs
To start transforming your assets, you need to select them in the Inputs section. Once the selection is made, click on the “Velocity” menu on the bottom, to start configuring your Run.
Check Velocity support
The first configuration step is to validate that your inputs are supported by the Velocity transformation. If some of them are not, the pop-up will display a page listing all elements that will be ignored by Velocity.

For a list of all supported Velocity types, please refer to the Legacy Types page.
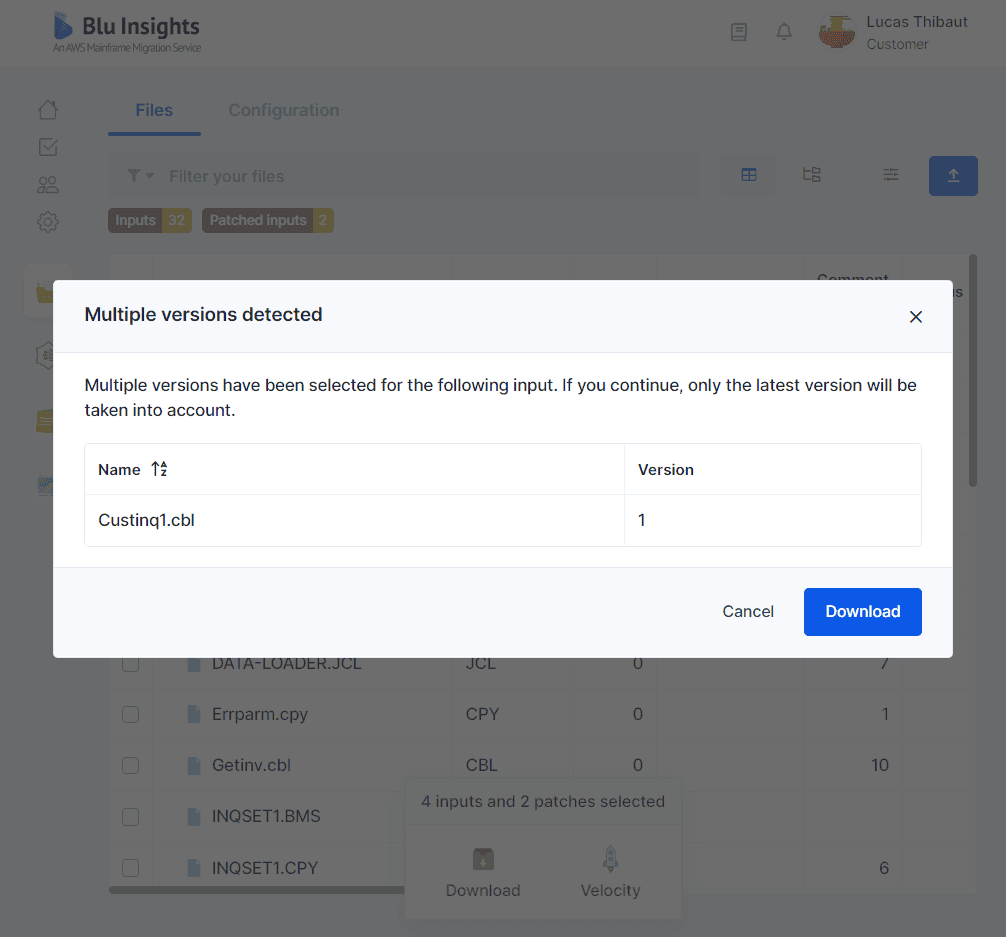
Validate multiple versions
The next step is to validate that you did not select multiple versions of the same file. If so, the pop-up will display a page listing all files with multiple selected versions.
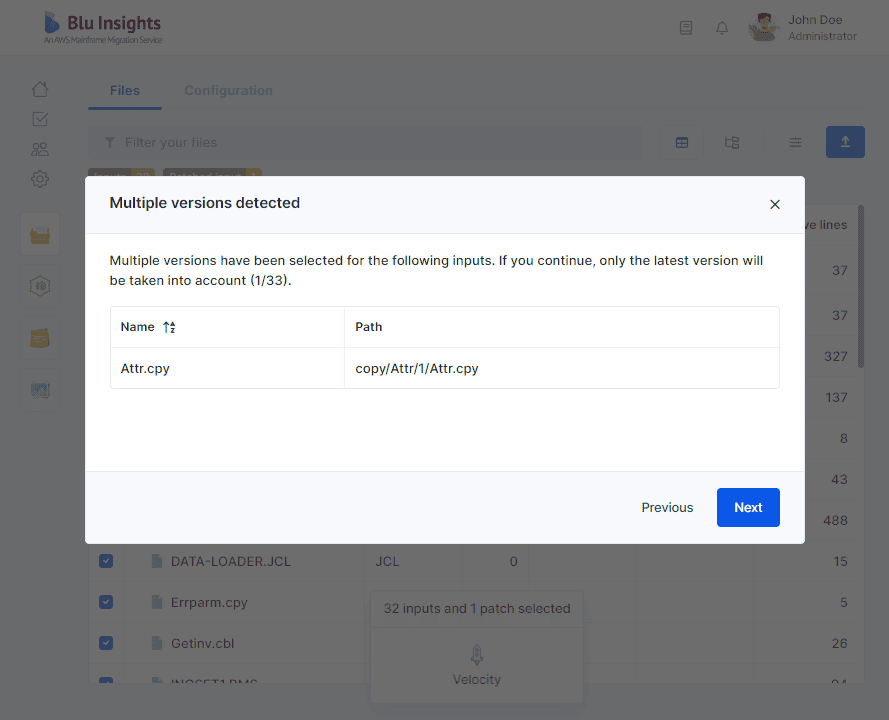
If multiple versions are selected, only the latest version of an input will be taken into account for the transformation.
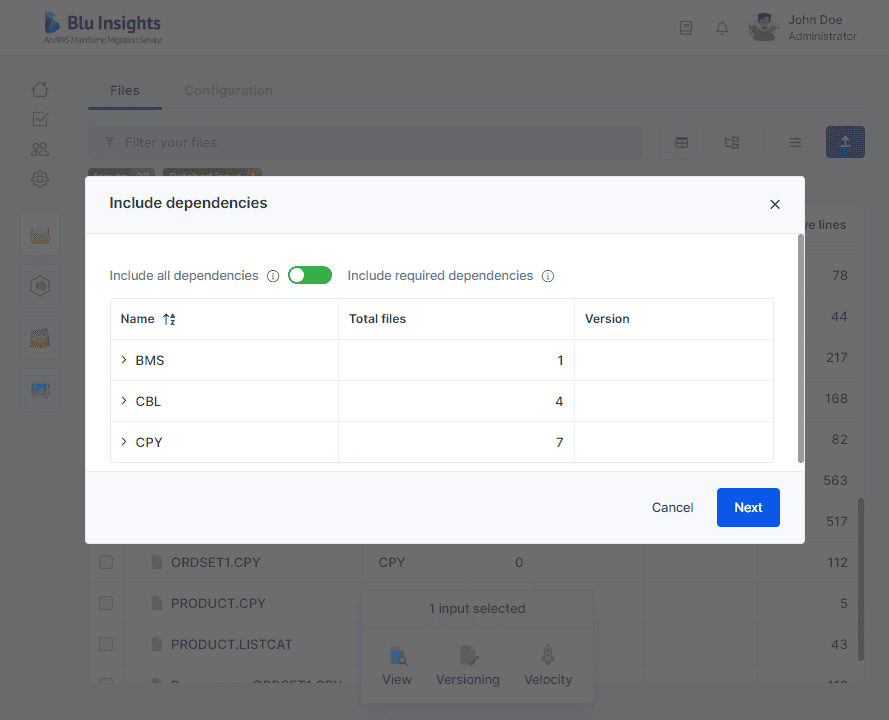
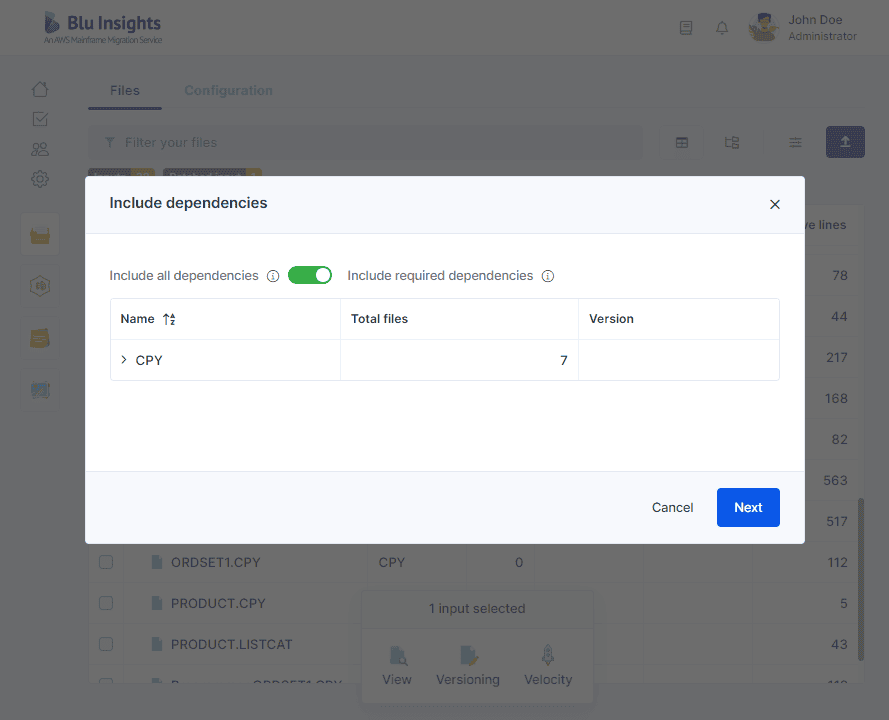
Include dependencies
The next step is to make sure that the elements you have selected make a complete and standalone batch of inputs, otherwise the modernization may be erroneous due to lack of information in possible missing files. AWS Blu Insights skips this step if the user selects all files (this will allow faster Runs).
Dependencies analysis is important to ensure Velocity won’t fail because of missing dependencies. If this analysis has not been launched in the codebase project, you may encounter trouble in your runs.
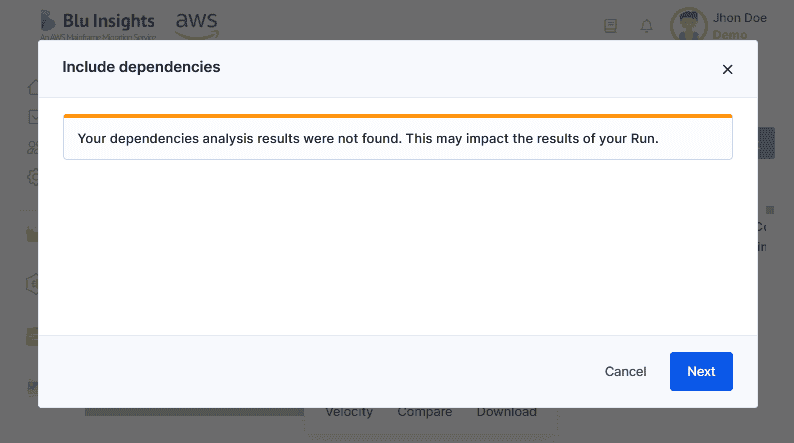
Three actions can be taken in the pop-up, if needed:
- Do nothing: this choice enables you to use the set of files that you selected and nothing else. This is the default behavior.

Run details
The last configuration step is to provide some details about the run you are about to launch.
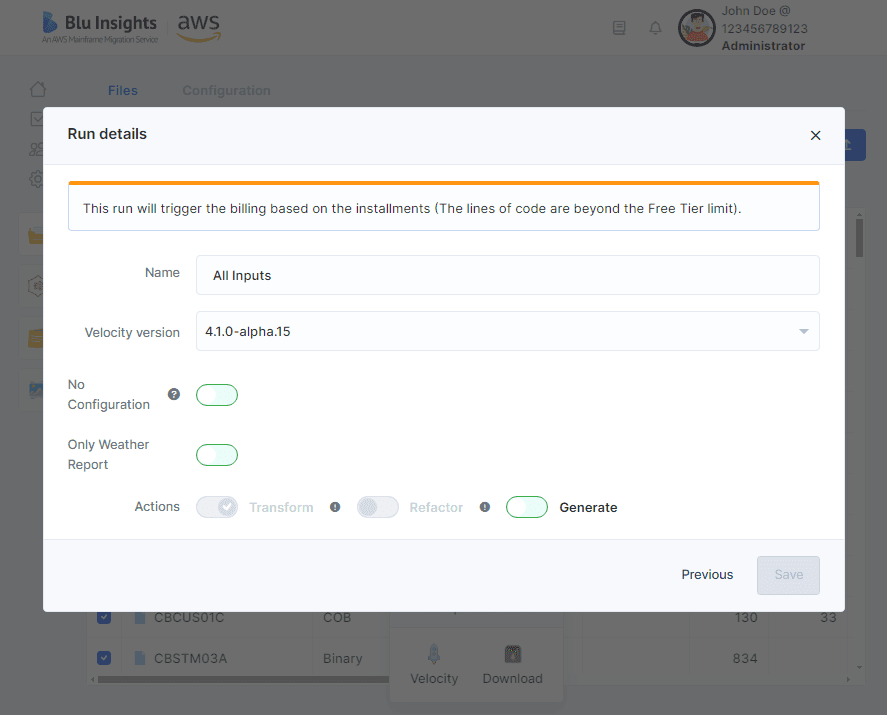
These details are the following :
- Number of lines and files to be billed. See Billing and Usage.
- Name: A unique name for the run, used to locate it among all;
- Velocity version: The Velocity environment on which you want to run your transformation. The dropdown lists all available Velocity versions.
- No Configuration: Allow you to launch a Run ignoring the existing Configuration.
- Only Weather report: Allow you to launch a Run with only weather report (nothing charged).
- This option is enable by default for billable projects only. To launch a standard run, click on the toggle.
- Actions: The actions you want to launch for the transformation. There are three actions :
- Transform: This step will import, parse and analyze your inputs to create intermediary files, necessary for the next steps.
- Refactor: This step allows you to apply Java refactorings on your intermediary files. The Transform action is required in order to select this action.
- Generate: This step will generate all Java elements from your intermediary files. The Refactor action is required in order to select this action.
Please note that detected new lines of code are charged only once independently from the Run and files status.
If you have selected a large amount of inputs, AWS Blu Insights will have to split them for better performances. The same configuration and Velocity version will apply to every run. You will find all your runs in Velocity Runs view.
When the details have been filled, you can click on “Save”. The run has been started.
Download inputs
To download inputs, select them and click on Download.
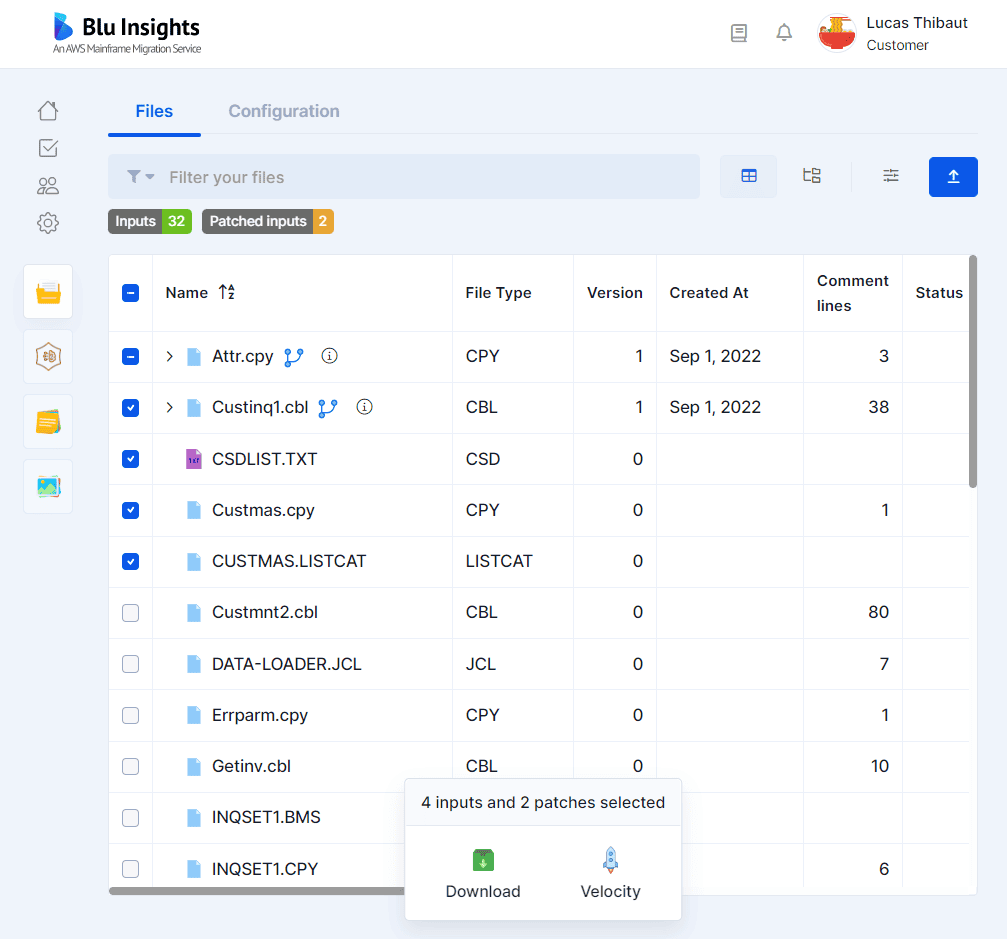
If multiple versions of the same input are selected, we will download only the latest version.
Downloading content is a restricted action in AWS Blu Insights. You will do so only if your AWS Blu Insights profile allows it.