Test Scenarios
Test Scenarios helps you to define and automate the validation of your modernized application. AWS Transform for mainframe refactor provides a three-step workflow to go from source code analysis to fully automated test execution:
- Generate test scenarios from your workpackages. This can be done manually or automatically.
- Generate data capture scripts to collect test scenario data from your mainframe environment.
- Generate replay scripts to replay and validate test scenarios against your modernized application.
Automated Test Scenario Generation
Instead of manually creating each test scenario, you can automatically generate them from your workpackages. The generation process analyzes the structure of a selected workpackage and creates one test scenario per sub-workpackage, preserving the hierarchy. Datasets (VSAM, PS, GDG, PDS, Control Cards, DB2 tables) are automatically detected.
⚠️ Before generating test scenarios, make sure you have workpackages created, which are used for defining the scope of test scenarios being generated. We also strongly recommend to run two prerequisite analyses on your codebase.
- Start by running Application Entrypoints— this identifies the entry points of your codebase (JCL jobs, CICS transactions, DB2 stored procedures, COBOL/PL1/RPG programs, etc.) and labels them accordingly.
- Then, run Application Features (optional, but strongly recommended), providing the entrypoints label and a parent workpackage. This creates workpackages corresponding to the standalone sets of assets reachable from each entrypoint, effectively splitting your codebase into testable application units. These generated workpackages are what the test scenario generation uses as input — one test scenario is created per sub-workpackage.
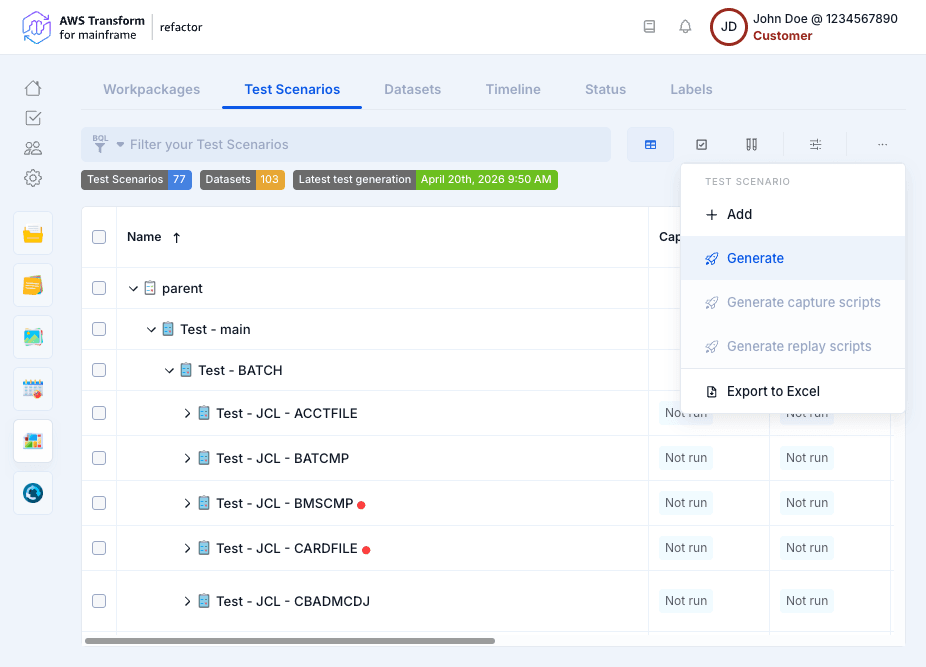
- Click Generate from the context menu.
- Select a Workpackage: Test scenarios will be created for all sub-workpackages of the selected workpackage.
- Select a Parent Test Scenario: The generated scenarios will be created under this parent. You can also create a new parent test scenario using the + button.
- Click Run.
NOTE: If the selected workpackage contains a large number of sub-workpackages, a confirmation dialog will appear before proceeding.
Dataset Direction Assignment
Dataset direction is determined from the dependency analysis:
- IN: Dataset is read by the program (Select query, Read Dataset, CICS Read operations).
- OUT: Dataset is written by the program (Insert/Update/Delete queries, Write Dataset, CICS Write/Rewrite operations).
- IN and OUT: Dataset is both read and written. If direction cannot be determined, it defaults to IN and OUT.
Test scenario results
For each sub-workpackage, the generation process::
- Creates a test scenario named after the workpackage.
- Detects datasets from the dependency analysis (VSAM, PS, GDG, PDS, Control Cards, DB2 tables, IMS DB).
- Assigns dataset direction (IN, OUT, IN and OUT) based on dependency types
- Links the test scenario to its corresponding workpackage.
- Detects scheduled-based path from nodes inside workpackages and creates test scenarios from them.
- If a workpackage contains more than one scheduled tasks, test scenarios generation uses the linear path detection algorithm
- From the graph computed only between scheduled tasks, a scheduled task is considered as
- A convergent node if the node has more than one parent node and zero or one child node
- A divergent node if the node has zero or one parent node and more than one child node
- A central node if the node has more than one parent node and more than one child node
- A middle node if the node has zero or one parent node and zero or one child node
- All paths between convergent/central nodes are considered a linear path to test
- The paths include the start/end node
- All elements in workpackage dependent of scheduled tasks included in a linear path are considered to define the test scenario
- In the description of each test scenario, the linear path is explicitly listed and a filter expression is added as comment to the test scenario and to be used in the dependency graph to highlight the linear path corresponding to the test scenario
- From the graph computed only between scheduled tasks, a scheduled task is considered as
- If a workpackage contains more than one scheduled tasks, test scenarios generation uses the linear path detection algorithm
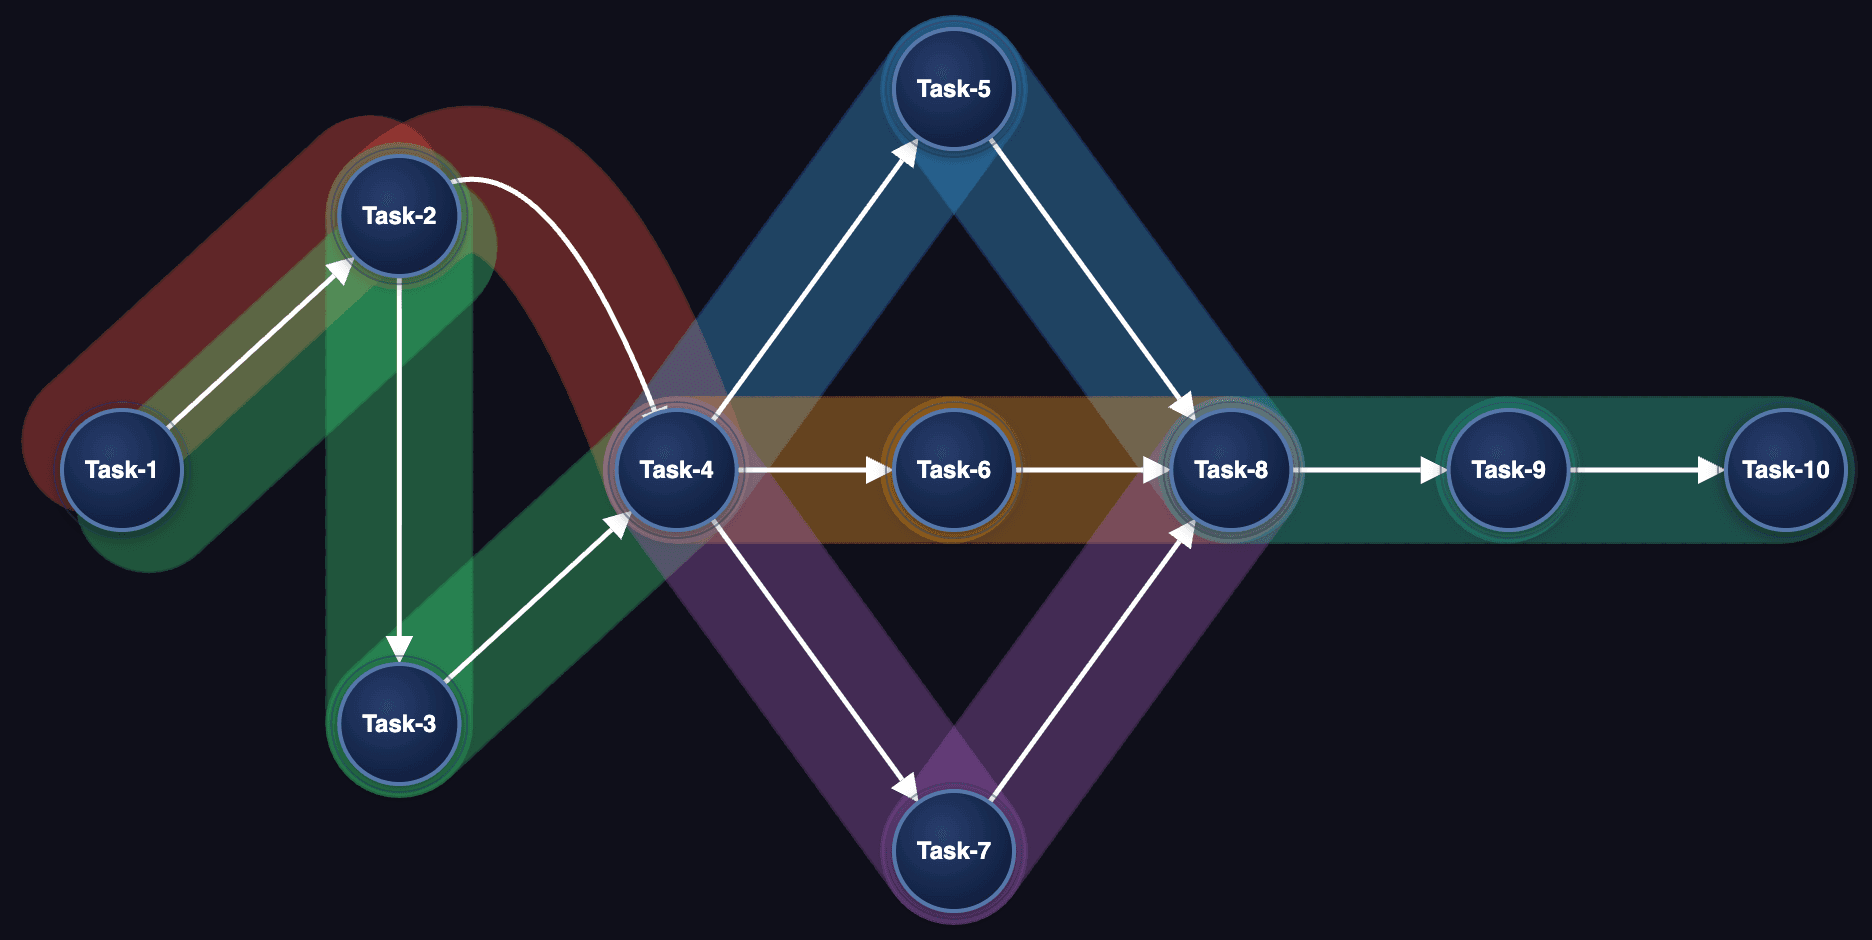
Example of scheduled-based path detection
- Work package contains Task-1 to Task-10 scheduled tasks and also all dependent nodes (JCL, programs, sub programs, datasets, etc.) from these scheduled tasks
- The graph below represent relationships between scheduled tasks only
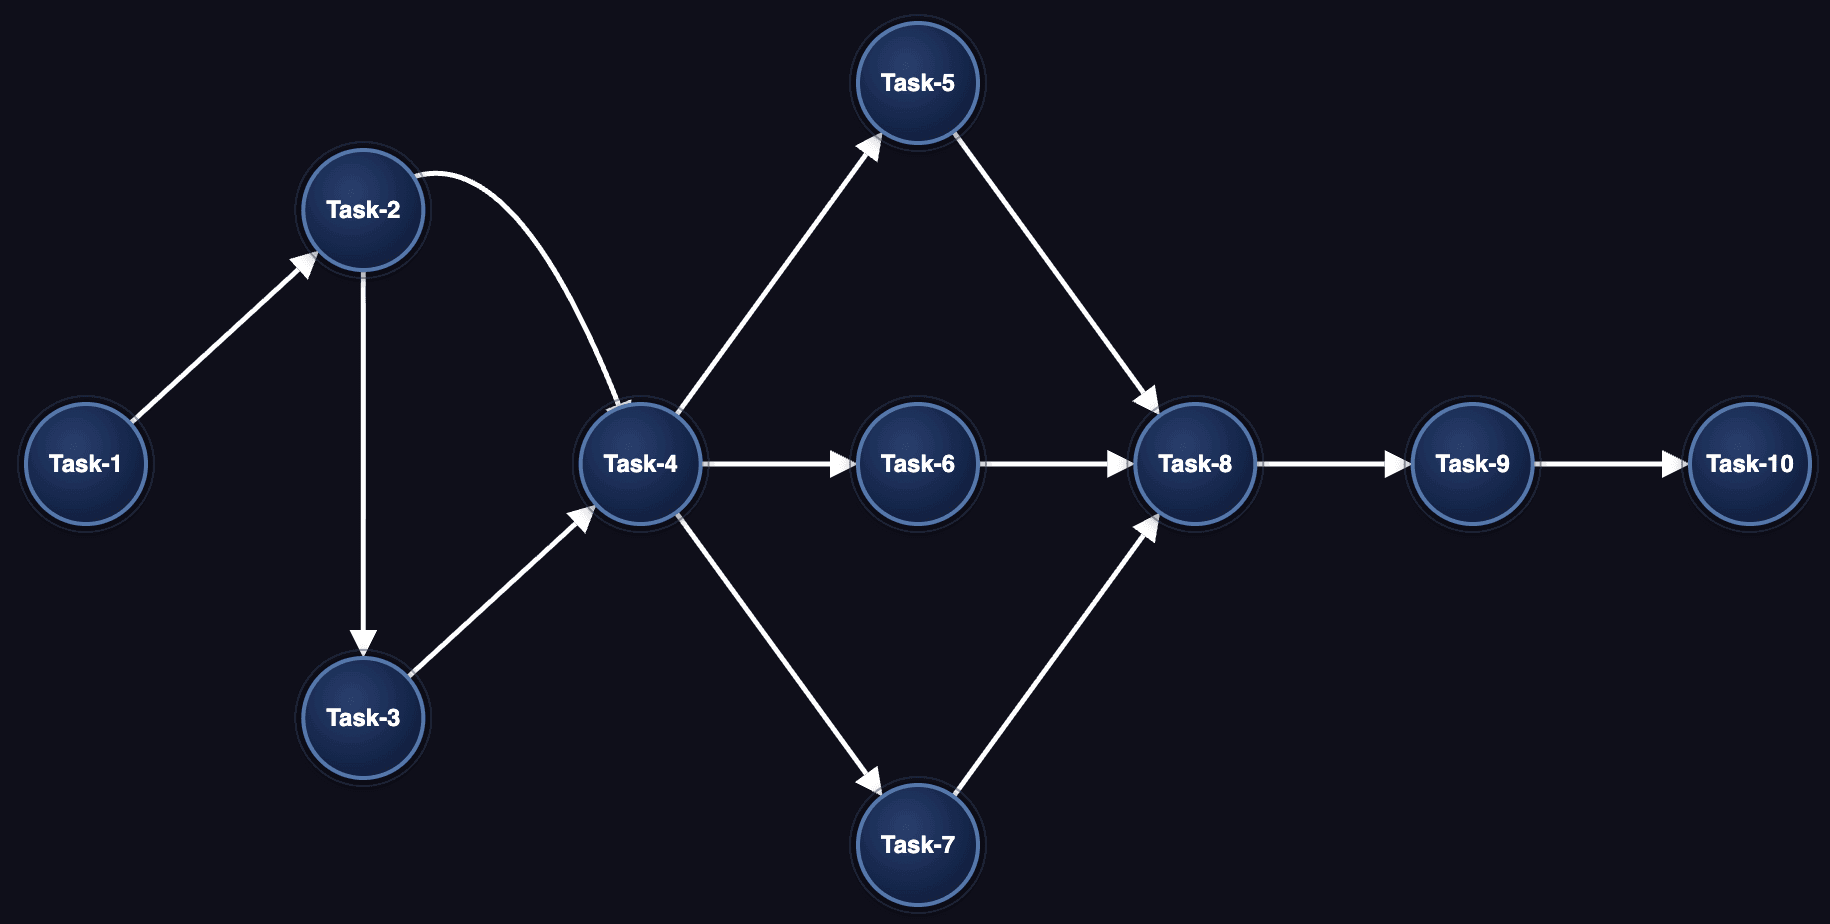
- Task-4 and Task-8 are convergent nodes
- Task-2 is divergent node
- Other tasks are middle nodes
- 6 test scenarios will be created, one for each linear path below:
You can then edit the recognized datasets and directions based on your project knowledge.
Test Scenario Types
Generated test scenarios are assigned a type based on their workpackage content:
- BATCH - Contains JCL jobs for batch processing.
- TRANSACTION - Contains CICS transactions.
- OTHER - Container or grouping test scenarios (e.g., parent workpackages with no direct entry points).
Scheduler-Based Linear Path Detection
When a workpackage contains scheduler tasks (CA7, Control-M), the generation process analyzes the scheduler dependency graph to detect linear execution paths. Each linear path becomes a separate test scenario containing the ordered sequence of JCL jobs.
Data Capture Scripts Generation
Data capture scripts are JCL scripts that extract test scenario data from your mainframe environment. They are generated from JCL templates that you provide — these templates define how data is extracted for each dataset type (VSAM REPRO, DB2 unload, sequential file copy, etc.). The generation process combines JCL templates with the datasets detected in your test scenarios, applying variable substitution and loop expansion to produce ready-to-run JCLs.
The generation optimizes the number of JCLs by combining all extraction commands per dataset type into a single JCL, rather than producing one JCL per dataset.
- Select one or more test scenarios (or leave the selection empty to generate for all).
- Click Generate capture scripts from the context menu.
- The dialog shows only the dataset types present in your selected test scenarios. For each dataset type, you can:
- View default: Preview the default JCL template for that dataset type.
- Upload template: Upload a customized JCL template adapted to your project.
- Click Run.
Once capture scripts have been generated, you can download them for the selected test scenarios. The download produces a ZIP archive containing the JCL scripts organized by test scenario and dataset type.
⚠️ The JCL templates provide flexibility to adapt to each mainframe installation utilities and practices for extracting data, transferring data, and sanitizing data. The default JCL templates are provided as-is. Users can add, modify, and remove steps in the templates as they see fit for conforming to their mainframe standards and best practices. It is the users responsibility to review, edit and check the relevance of the templates to match their mainframe application requirements before running them in their mainframe environment.
JCL Template Variables
JCL templates support variable substitution using <<variable-name>> syntax. Reserved variables include:
<<job-name>>: The generated job name.<<test-case-name>>: The test scenario name.<<dataset-name>>: The dataset name being processed.<<dataset-direction>>:The dataset direction (IN, OUT, IN_OUT).<<dataset-direction-folder>>: The direction folder name (before, after).<<dataset-type>>: The dataset type (VSAM, FLAT, GDG, etc.).<<dataset-type-folder>>: The type folder name.<<loop-datasets-start>>/<<loop-datasets-end>>: Loop markers to repeat a JCL section for each dataset.- By default,
<<loop-datasets-start>>is bounded to 255 datasets per JCL (the mainframe JCL step limit): when a test scenario has more than 255 datasets of the same type and direction, extra JCLs are generated so each one stays within the limit. You can override this cap by writing<<loop-datasets-start-N>>, where N is a positive integer (for example,<<loop-datasets-start-100>>produces one JCL per 100 datasets).
- By default,
<<loop-index>>: The current loop iteration index.<<loop-index-X>>: The current loop iteration index, zero-padded to X digits (where X is a number from 1 to 10). Useful for generating fixed-width identifiers in JCL step names or job names.- e.g.
<<loop-index-6>>produces000001,000002, etc.
- e.g.
Replay Scripts Generation
Replay scripts are a self-contained test automation bundle that can fully replay and validate a test scenario end-to-end against a running modernized application. The generation process automatically produces file format definitions and comparison configuration files (BACMP) adapted to each test scenario, so that datasets can be compared with limited manual setup.
- Select one or more test scenarios.
- Click Generate replay scripts from the context menu.
- Review the summary showing which test scenarios will be processed.
- Click Run.
Once replay scripts have been generated, you can download them for the selected test scenarios. The download produces a ZIP archive containing the replay scripts.
IMPORTANT: In order to successfully generate read-to-use fileformats definitions and comparison configuration files (BACMP) automatically, ensure that you have previously performed a Compatiblity analysis on your codebase (optional, but highly recommended).
Generated output structure
The generated replay scripts bundle contains:
outputs/
├── common/                          # Shared resources for all test cases
│   ├── config/
│   │   └── default.env              # Default environment configuration
│   ├── lib/                         # Shell libraries (logging, error handling, AWS utils, validation)
│   ├── scripts/                     # Execution scripts (init, run_job, compare_output, data_migrator)
│   ├── working-dir/                 # Groovy scripts deployed to the server (bluesam-load, bluesam-unload)
│   └── run_test_cases.sh            # Main entry point
├── test_cases/
│   └── <TestCaseName>/              # One folder per test case
│       ├── test_case.json           # Test case definition (jobs, timeouts)
│       ├── test_plan.json           # Full test case metadata
│       ├── config.env               # Test-case-specific configuration overrides
│       ├── before/                  # Input datasets (to load before job execution)
│       │   ├── flat/                # Sequential/PDS datasets
│       │   ├── vsam/                # VSAM datasets
│       │   ├── gdg/                 # GDG datasets
│       │   ├── controlcard/         # Control cards
│       │   └── db/                  # Database datasets
│       ├── after/                   # Expected output datasets (for comparison)
│       │   └── (same structure as before/)
│       ├── compare/                 # Comparison configuration
│       │   ├── binary.bacmp         # Binary comparison descriptor (if binary datasets exist)
│       │   ├── database.bacmp       # Database comparison descriptor (if DB datasets exist)
│       │   └── data/binary/fileformat/  # File format definitions for binary comparison
│       ├── before.ini               # Database init config (if DB datasets exist)
│       └── after.ini                # Database expected state config (if DB datasets exist)
└── test_plan.json                   # Overall test plan with generation status
How to execute my replay scripts?
- Unzip the downloaded archive, and the sub-included archives
- Download Compare Tool and Data Migrator into
common/toolsfrom the Refactor Toolbox - Edit
common/config/default.envwith your environment settings:S3_BASE_BUCKET: S3 bucket containing test data.HOST_URL: URL of the running modernized application.SERVER_WORKING_DIR_PATH: Application working directory path.SERVER_SCRIPTS_PATH: Location of server groovy scripts (must match the-Dconfiguration.scriptsJVM parameter).
- Run the desired test case
./run_test_cases.sh "<test case name>"
For detailed execution instructions, see common/README.md
IMPORTANT: The mainframe modernized application must be deployed, configured, and running on the target server before executing test cases. The application should be accessible via HTTP endpoints for job execution. To deploy your modernized application locally in a short time, you can rely on the "Bundle" action of the Transformation Center, it will generate a pre-configured standard Docker architecture, containing all necessary artifacts (application, database, working directory).
Execution Workflow
The replay script execution follows three phases:
Phase 1 — Initialize Test Environment
1. Download test case data from S3.
2. Clean the application working directory.
3. Deploy groovy scripts to the server and reload them (POST /reloadscripts).
4. Copy "before" datasets (flat, VSAM, GDG) to the application working directory.
5. Load VSAM data into the application (POST /script/data-load).
6. If database datasets exist: run Data Migrator with before.ini to load initial database state.
Phase 2 — Execute Jobs
1. Execute each job sequentially via HTTP (POST /script/{JOB_NAME}).
2. Each job reads/writes the application working directory and database.
3. Per-job timeout and retry settings are defined in test_case.json. By default, each job is allowed up to 3 retries with a 5-minute (300s) timeout per attempt
Phase 3 — Compare Outputs
1. If compare/binary.bacmp exists: collect actual output files from the working directory, compare against expected files from "after" using the Compare Tool.
2. If compare/database.bacmp exists: run Data Migrator with after.ini to load expected database state, then compare "before" and "after" database schemas using the Compare Tool.
3. Upload comparison results to S3.
Comparison type is driven by file presence — if binary.bacmp exists, binary comparison runs; if database.bacmp exists, database comparison runs. No configuration flags are needed.
Manual Edit of your Test Scenarios
You can define Test Scenarios for your project, update them and track both their status and results. Test Scenarios can be viewed as a list, per type (Online, Transaction, Batch, Other) or per Results.

A test scenario has different information:
- Name and Description
- Parents: If the Test Scenario is part of the other ones. Otherwise, it will be a root element.
- Datasets: Datasets are automatically generated during test scenario generation and include VSAM, PS (sequential), GDG, PDS, Control Cards, DB2 tables, and IMS DB. Dataset direction is determined from the dependency analysis (based on the DISP parameter for PS, GDG, and VSAM).
- Team Member: Team member in charge of the test scenario (the list of members is automatically filled by invited and registered members).
- Status: The status of the Test Scenario.
- Period: Start and End dates.
- Events: You can associate an event to the start or the end date by enabling the appropriate toggle. If an event is already associated with the start or the end date the toggle will be active and the details of the associated event will be available below the Planned Period section.
- Workpackages: The workpackage(s) linked to the test scenarios.
- Labels: The label(s) linked to the test scenarios
- Result: The result (failure/not run/success) of the Test Scenario.
- Comments: Team members can add a comment (with a specific type) linked to the Test Scenarios
All these details can be edited using the Selection Properties that automatically appear when one or many scenarios are selected. It is also possible to import (using Excel files) a list of Test Scenarios with all their related attributes.
Test Scenarios can also be linked to Jira and/or Jenkins to respectively track issues status and/or Jobs.
Overview of supported technologies & datasets
Supported data stores
| Data store | Automated Test Scenarios | Capture scripts | Replay scripts |
| PS | Yes | Yes | Yes |
| VSAM | Yes | Yes | Yes |
| GDG | Yes | Yes | Yes |
| Control Cards | Yes | Yes | N/A |
| PDS | Yes | Yes | N/A |
| DB2 | Yes | Yes | No |
| IMS DB | Only detection, direction needs manual input | Yes | No |
Support by platform
| Platform | Supported features |
| IBM Mainframe (z/OS) | Schedulers: Control-M, CA7 CICS: transactions, files, datasets IMS DB / TM (IMS Stage 1) DB2 tables Files: PS, GDG, VSAM (KSDS, ESDS, RRDS) |
| GS21 | Files: PS, GDG |