User guide
Introduction
The purpose of this documentation is to explain how to use the pipelines. This is not a technical documentation. If you feel that you want more explanation about the pipelines when you reach the end of this documentation (see How do pipelines work?)
Gitlab
DevOps Pipeline deploys a standalone Gitlab server only reachable within the VPC.
How to connect to Gitlab?
- Connect to your developer windows EC2
Open
https://gitlab.bluage.localGitlab repositories
gitlab-devops: This gitlab repository contains SDE DevOps Pipeline scripts and config files. Developers don’t have to modify this directory.gitlab-<PROJECT_NAME>-modern-application: This repository contains the modernized application code used by developers. This is the one SDE DevOps Pipeline uses for building the project.gitlab-<PROJECT_NAME>-server: This repository contains the tomcat config files, groovy scripts and other stuff for the modernization server. This is the one SDE DevOps Pipeline uses for building the project.gitlab-<PROJECT_NAME>-test-cases: This repository contains the test case config files used by developers. This is the one SDE DevOps Pipeline uses for building the project.Building pipelines
The building pipelines are the pipelines that build the project and deploy the application on ECS. Initially, we only deploy the pipeline for the branch master of the project. As of a user, you will be able to deploy pipelines for other environments.
The initial building pipelines is called:
codepipeline-app-master
Each pipeline is related to an environment and related to a specific branch of thegitlab-<PROJECT_NAME>-modern-applicationandgitlab-<PROJECT_NAME>-serverrepositoriescodepipeline-app-masteris related to the master branch.How to create a building pipeline?
- Go the Systems Manager AWS console and open Parameter Store
- Open
/dop/VARIABLES - Modify the
ENVIRONMENTSarray by adding the name of your new branch - Make sure the branch is created for the
gitlab-<PROJECT_NAME>-modern-applicationandgitlab-<PROJECT_NAME>-serverrepositories before changing the Parameter Store. - The name of the pipeline created will be as follows:
codepipeline-app-<BRANCH_NAME> - You need to run the
codepipeline-jenkinsto take into account your modification on Jenkins
Note: This change will trigger the
codepipeline-building-pipeline-factorypipeline creating a new testable environment.Parameter Store
All variables in the
/dop/VARIABLESparameter store are editable by developers.
How to trigger the pipelines?
You can trigger the pipeline in 2 ways:
Manual triggering
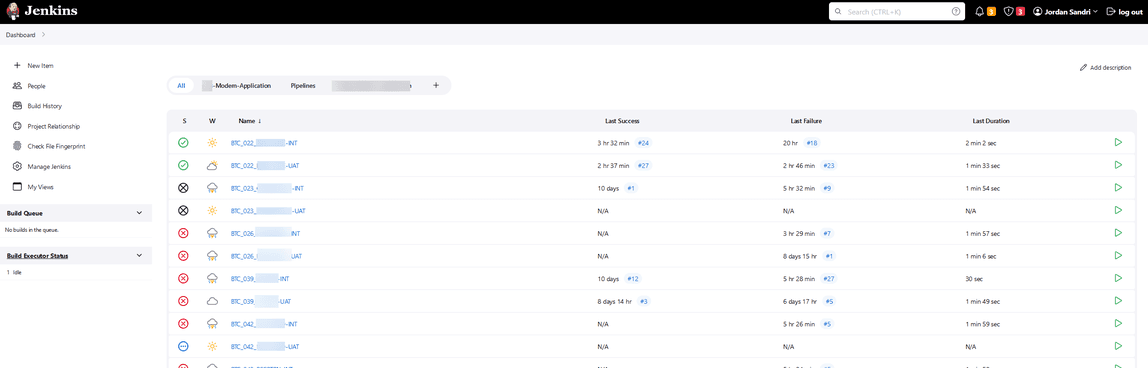
- Go to AWS CodePipeline Console
- Click on the pipeline you want to run. (see screenshot)

Note: If you don’t see your pipeline you can maybe search for it in page 2 or further
Click on the Release Change button and then Release.
Automatic triggering
- Pipelines are also triggered automatically depending on their sources.
For example, pushing some code on the master branch of the
gitlab-<PROJECT_NAME>-modern-applicationrepository will triggercodepipeline-app-master.How to check if the application has well been deployed?
- Go to AWS CodePipeline Console
- Click on the pipeline you want to check
- If the deployment succeeded, the AppDeployment stage will be green

- If this stage failed, then follow these steps: Can I see the application logs after a commit?
Note: If implemented, you will receive a message on a slack channel as well (common slack name: bluage-notifications-
How to connect to the modernized application?
To access the interface of the application, connect on your dev windows EC2 inside your project’s VPC. Depending on the environment you want to connect, here are the URLs:
Where do the pipelines fetch the sources to build the tomcat docker image?
Binary files
The pipeline will fetch the sources in the s3-<AWS_REGION>-<PROJECT_NAME>-velocity-<ACCOUNT_ID> S3 of your project account. So as a developer, you will have to put your binary files (.war and .jar files) in this S3. The CDK scripts deploy the following tree structure in the s3 and other directories won’t be taken into account.

The pipeline will fetch the .jar and the .war files in velocity/runtime and velocity/webapps.
If you want some patches you can put your .jar files in velocity-patches/runtime and your .war files in velocity-patches/webapps.
WARNING:
.warfiles invelocity-patchesoverride those fromvelocity/webappsso they need to have the exact name. It’s not the case for.jarfiles
In the classpath directory put all the .jar files that you want to be accessible from the CLASSPATH variable. As a developer, you won’t have to configure the setenv.sh file, the pipeline takes care of it. However, if you want to modify it, check gitlab-devops/codebuild/codebuild-app/config/tomcat/bin/setenv.sh
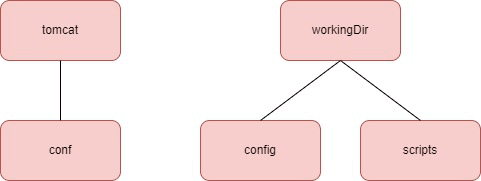
Tomcat config files
From now on, DevOps and Devs will have the same Tomcat configuration files. The config and conf files of the Tomcat configuration will be fetched from the gitlab-<PROJECT_NAME>-server repository with the following tree structure:
Setup the requirements for the CI
Read Setup the SDE DevOps Pipelines requirements to learn how to fill correctly this s3, how to configure the application and more.
How to see the application logs?
Codepipeline
Logs are directly available on CodePipeline:
- Go to the AWS CodePipeline console
- Click on the pipeline you want to check the logs of the last deployment
- In the AppDeployment stage, the ecs-cluster-app action returns the status of the deployment and the codebuild-app-check-deployment action returns the logs of the last deployment.
Note: The status of the deployment can be green but you might encounter issues in the modernized application deployment logs. So please check for the status of all the actions in the AppDeployment stage.
CloudWatch
Logs are available in CloudWatch:
- Go to the AWS CloudWatch console
- In the left panel, click on Log groups
Search for the log group called
/ecs/app-<BRANCH_NAME>or/ecs/app-<BRANCH_NAME>Does the pipeline store the previous .war gapwalks generated by the pipeline?
Yes, all the
.warfiles are stored in the following s3 of your account project:s3-<REGION>-app-pipelines-artifacts-<ACCOUNT_ID>
You can find in this S3 the .war files generated by the pipeline and those fetched from the Velocity S3 or the gitlab-<PROJECT_NAME>-server repository depending on the configuration in the pom.xml.
How to connect to Sonarqube?
Sonarqube is only reachable from EC2s being inside your project’s VPC, so you can use your dev windows EC2 to connect to it. Sonarqube can be executed on all environments. For that you can modify the RUN_SONARQUBE variable by true or false when running the building pipeline of this specific environement. When the pipeline ends you will be able to see the report by connecting on the following URL:
Note: The credentials for Sonarqube are in AWS Secret Manager.
Testing pipeline
Gitlab Repository
The Gitlab repository used for putting test case config files is gitlab-<PROJECT_NAME>-test-cases.
Tree structure
The tree structure of this repository is essential as it determines the good working of your test cases and what will appear in Jenkins later. You cannot change the name of these directories.
See below a diagram of the tree structure:
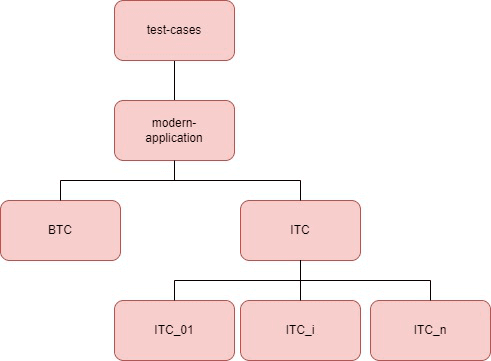
Note: BTC test case directories are not represented but have the same tree structure as ITC test cases.
All the test cases have the same tree structure, no matter if it’s a BTC or ITC test. See below a zoom into the structure of a specific test case directory:
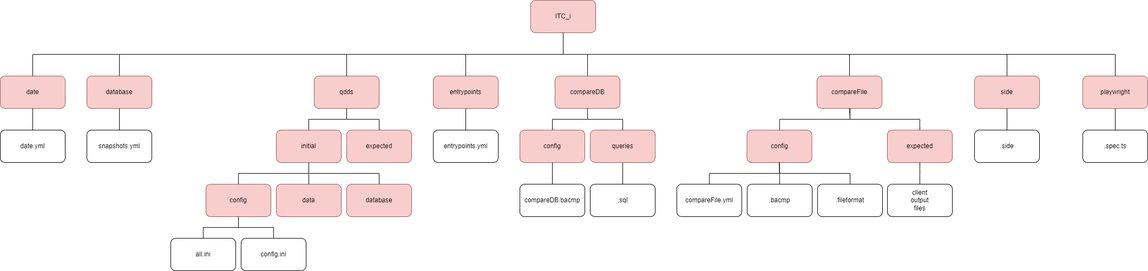
Note: Red boxes are directories, white boxes are files
Note2:
ITC_i/qdds/expectedhas the same tree structure thanITC_i/qdds/initial. However, today we use snapshots so qdds directory is deprecated.
The naming convention is crucial here:
- All the directory names you see above must be respected
all.iniandconfig.inimust be named this way- The name file does not matter. However, extensions must be respected.
Important: You are not forced to have the below directories in your test case. However if you create one then you have to respect the tree structure under this directory (as shown on the diagram above):
- database
- qdds
- entrypoints
- compareDB
- compareFile
- side
- playwright
Exception: The qdds directory can contain the initial or expected directory or both.
Mandatory: However, the date and database directories and their inner files are mandatory for running every test case.
Config file examples
snapshots.yml
APP_DB_SNAPSHOT_NAME: <SNAPSHOT_NAME>
APP_DB_TECHNO: <DB_TECHNO>
APP_DB_INSTANCE_TYPE: <EC2_INSTANCE_TYPE>
Note:
APP_DB_TECHNOis the type of database you want to use. Refer to RTS techno typesentrypoints.yml
# EntrypointName: Timeout (seconds)
ENTRYPOINTS:
- <ENTRYPOINT_NAME_1>: <TIMEOUT_1>
- <ENTRYPOINT_NAME_2>: <TIMEOUT_2>
- ...
Note: ENTRYPOINTS can have as many entrypoints as you want
compareFile.bacmp
If your .bacmp file refers to an input file in the details section, it must not contain the extension (e.g .bin). See example below:
{
"comparisonType": "Binary",
"binary": {
"details": {
"O.F.PC04": { # No extension!
"fileformatName": "ff_19.fileformat"
}
},
"folders": {
"leftFolder": "output",
"rightFolder": "expected",
"fileformatFolder": "config"
},
"splitRecordFormats": true
},
"comparaisonDataStorage": "InRam",
"doublePrallelisationEnabled": true
}
Note : leftFolder, rightFolder and hostName for DB comparison are modified by the pipeline before running the test case
.spec.ts
In your playwright files, it is really important that you don’t commit the .spec.ts file using hardcoded server IP inside. Every time, you will have to specify the server DNS, you need to give the APP_URL environment variable as follows:
await page.goto(`${process.env.APP_URL}`);
Note: SDE DevOps pipelines will modify on the fly this variable (
APP_URL) in the Jenkins test for the CI needs.
When calling playwright manually on your EC2, you can give this variable as a parameter:
APP_URL=https://app.bluage.local/<BRANCH_NAME> SELENIUM_REMOTE_URL=https://selenium.bluage.local npx playwright test
Note: The name of your file has to finish with
.spec.tsfor being taken into accountIMPORTANT: When giving the SELENIUM_REMOTE_URL variable you are forced to write https:// - otherwise you will get a connect ECONNREFUSED error
IMPORTANT2: If the port of the app is not 80, add the port to the EC2_DNS variable
Video on failure
The video will be available in the Jenkins reports only on failure.
Note: If you want to take screenshots on failure, read the following: https://github.com/microsoft/playwright/issues/14854
How does Jenkins consider your entrypoint successful?
Your entrypoint will be in success if the output is a JSON with the status field to “Succeeded” or the HTML output is “Done.”
EFS configuration
Inside the efs-test-cases, you will have to put your input and expected files for your BTC test cases by following this tree structure:

IMPORTANT: your input and expected files must not have any extension in the EFS!!
Note: As a developer, what inside jobs and workingDir directories should not be modified
Note2:
BTC_iis the name of your BTC as you wrote it in thegitlab-<PROJECT_NAME>-test-cases repository. Name of the test case without the env.
Pipeline Information
As a developer, you won’t trigger the Jenkins pipeline but you need to know how it works. The name of the pipeline is:
codepipeline-app-jenkins
This pipeline is triggered every time there is a commit on the gitlab-<PROJECT_NAME>-test-cases repository. If you commit a new BTC or ITC job, that is, you created a new repository in the BTC or ITC directories, the job will be automatically added to Jenkins and duplicated for each environment. You will have to wait the end of the pipeline to see the new job appeared in Jenkins. The pipeline takes roughly a couple of minutes.
However, if this is just an update of your job, that is, the job has already been created before but your new commit just modified a config file, then once you committed, you are not forced to wait for the end of the pipeline to run your job on Jenkins as every Jenkins job clone the Gitlab repository when running a job.
Jobs are executed every night at 8pm (CET time), except on Friday and Saturday nights.
Jenkins
How to access Jenkins?
To access Jenkins, you have to use your developer Windows EC2 inside the VPC of your project.
Note: If you don’t have any account ask your testers or project manager to create a account for you. Please do not create a guest user.
IMPORTANT: If it is your first connection, change your password by clicking on your name on the top right of the Jenkins page, then configure on the left panel and at the very bottom of the page fill in the password field.
How to navigate in Jenkins?
At your first connection, you will land on this page
You can notice 2 views:
modern-applicationgathers all the test cases related to your project- Pipelines have only one pipeline for now, allowing to run all jobs in a specific environment on a specific project
Click on the modern-application view, select your type of test case ITC or BTC and then your environment.
Note: All your test cases in the Gitlab repository will be deployed for each environment in Jenkins. The same test case depending on the environment will be not executed on the same application.
Once you get to this page, you can then start any job you want clicking on the green arrow.
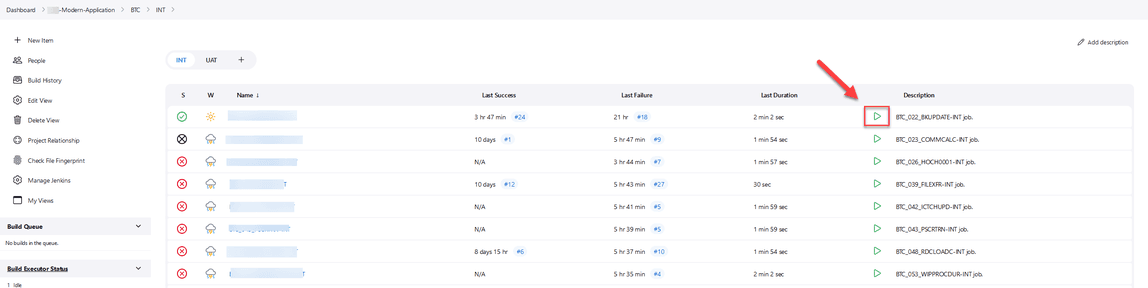
Note: When you run a job it will ask you some information. Depending on what you want to run, check the corresponding boxes. For example, check RESTORE_DB if you want the initial and expected DB to be restored.
See the execution report
Once your job is running you can click on its execution number

Note: The HTML Report on the test case main page only refers to the last execution
You can then have access to the logs and the report
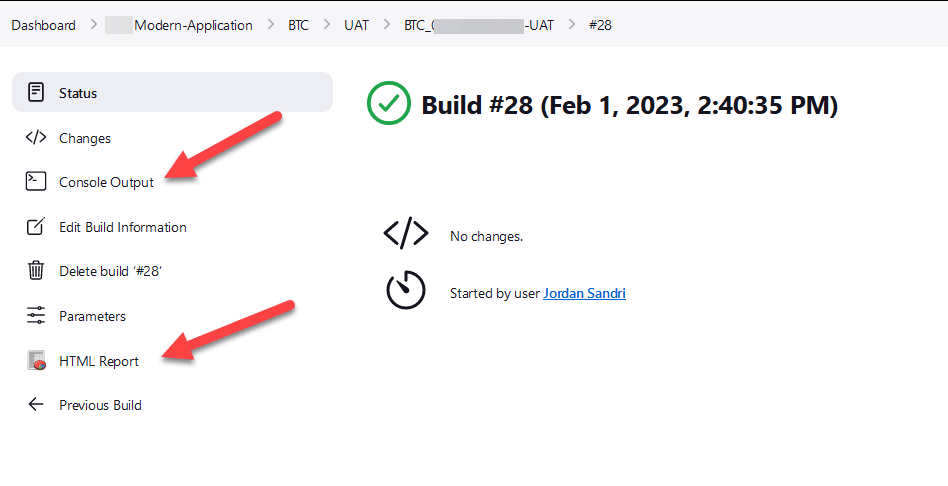
Note: Each test case keeps the last 30 executions and their report
Jenkins Status
Your test case can end with 3 different status

Your test case returns an exit code different of 0. It fails somewhere.

Your test case returns an exit code different of 0 but the test already passed in the past.

Your test case returns 0 as exit code without error.
Execution order
Here are the phases executed while running a test case:
- Creating the initial and expected databases
- Creating the container running the application
- Running DataMigrator script
- Running Groovy Script
- Running Selenium Script
- Running CompareDB script
- Running CompareFile script
- Running Jacoco script
- Deleting the databases and the container running the application
Note: Of course, most of the phases are optional and will not be executed if one directory in your test case (qdds, entrypoint, compare, side) presented in the tree structure chapter is missing
How to add another test type in Jenkins?
Merely modify the tree structure of the gitlab-<PROJECT_NAME>-test-cases repository
Other useful Jenkins jobs
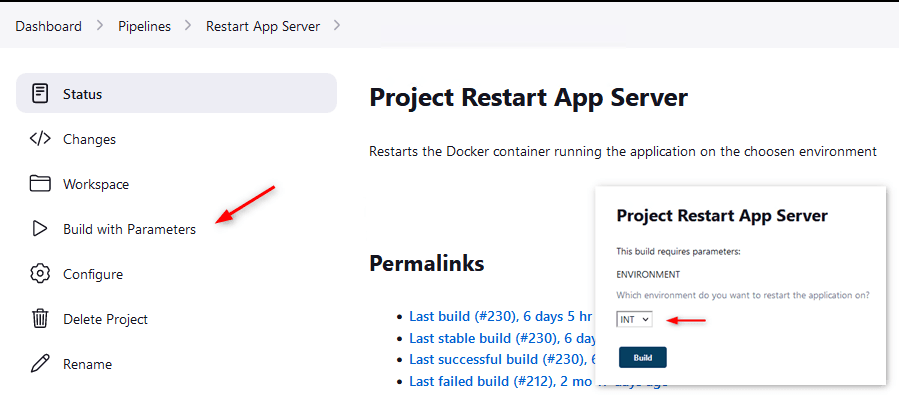
Restart App Server
This job will restart the static servers, that is, the ones created by the building pipeline.
Click on the Pipelines view, click Restart App Server

Click Build with Parameters and select your environment.
Cleaner
Cleaner is a job that you will never have to execute. This job is executed every night and delete ECS containers, EFS directories, S3 directories that could be residual when running a job. (Everything older than 6 hours is deleted)
Note: Sometimes some ECS containers or files are not deleted properly in a job, that why’s this job exists
Restart App Server
The Restart App Server job restarts the
app-<BRANCH_NAME>static server.Job Runner
Job Runner is a job allowing us to run all the jobs for a specific type of test cases and environment. For example, you want to run 100 BTC tests on master, either you execute them one by one (and this is annoying) or you run this job by selecting your type,
BTC, and your environment,master, and tadaaaaa, all the jobs are run at once.Jacoco reports
The Jacoco reports is a job to generate the complete Jacoco reports of all the test cases. Basically, it merges all the Jacoco report files of the latest build of each job and generates a report.
Be careful: If a job is running it will take the previous Jacoco report. However, if a job failed but succeeded in the past it will consider the Jacoco report as missing.