Setup Gitlab
Create a CodeStar Connection (Mandatory)
You need to create a CodeConnection to GitLab in order to make CodePipelines work. This connection is a sort of token to the CodeSuite tools to connect to Gitlab.
- Go to Connections. You can find Connections by going to any CodeSuite tool (CodeBuild, CodePipeline, etc), you can find it in the Settings section of the left panel

- Click on Create connection
- Select the GitLab self-managed provider
- In Connection name, type
Gitlab - The URL is
https://gitlab.bluage.local - Tick the Use a VPC box
- Select the
BluPocVPC - Select the
Private0subnet - Select the
seg-ec2-nlb-gitlabsecurity group - Follow these steps to fill the TLS certificate field:
- Open a new tab to the AWS Certificate Manager (ACM) console
- In the left panel, click on List certificates
- Click on the Certificate ID where the Domain name is
*.bluage.local - In the top right, click on Export
- Type
gitlabfor the passphrase - Tick the Billing acknowledgment box
- Click on Generate PEM Encoding
- Copy the Certificate body
- Come back to the CodeConnection tab and paste the certificate in the TLS certificate field
- Click on Connect to Gitlab self-managed
A window summarizing your connection appears. Wait for the Setup status in the Host section to turn Pending. (It can take up 5 mins). While waiting for the Setup status to be updated. We are going to create a Gitlab API token for the next steps
- On your local computer, open a terminal, paste your temporary credentials and type the following command:
aws ssm start-session --region <AWS_REGION> --target <EC2_INSTANCE_ID> --parameters host="gitlab.bluage.local",localPortNumber="443",portNumber="443" --document-name AWS-StartPortForwardingSessionToRemoteHost
Note: The
EC2_INSTANCE_IDvariable must be the EC2 instance ID ofec2-<AWS_REGION>-gitlab
- Modify your
C:\Windows\System32\drivers\etc\hostsfile by adding the following line:127.0.0.1 gitlab.bluage.local - On your preferred browser, open
https://gitlab.bluage.local - The
rootcredentials of Gitlab are referenced in the/gitlab/rootsecret of the AWS Secret Manager. Retrieve the credentials by clicking on Retrieve secret value - Connect to Gitlab with these credentials
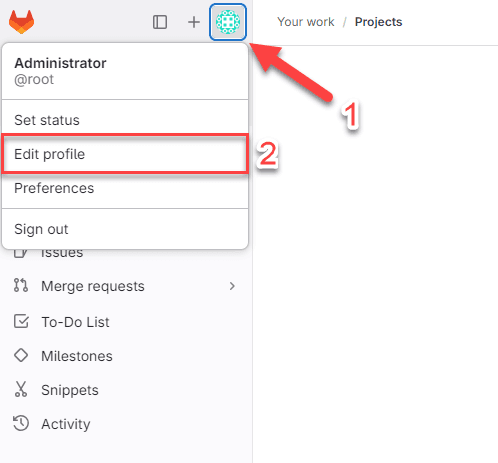
- On Gitlab, click on your avatar and Edit profile
- In the left panel, click on Access / Personal Access Tokens
- Click on Add new token
- In Token name, enter
AWS - The expiration date must be the end of the project
- In the Select scopes section, tick api
- Click on Create token
- Copy your personal access token
- Go back to the
gitlab/root/ secret of the AWS Secret Manager.- Edit the secret
/gitlab/root - Paste your copied access token as
patfield value - Click on Save
- Edit the secret
- Go back to the AWS CodeConnection Console and once the Setup status turns
Pending, click on the new button Update pending connection appearing - A new windows pops up requiring your Gitlab token. Paste it.
- Optional - The
rootcredentials of Gitlab are referenced in the/gitlab/rootsecret of Secret Manager. Retrieve the credentials by clicking on Retrieve secret value. Connect to Gitlab with these credentials. - Optional - Click on Sign in
- Click on Authorize AWS Connector for Gitlab Self-Managed
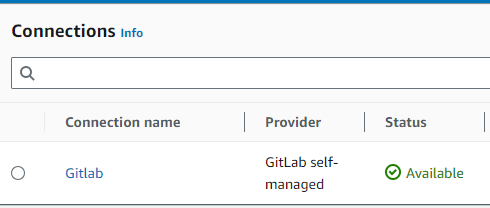
- Check your connection Status. It should appear as Available
Copy the CodeConnection ARN and paste it in the
env.ymlfile of the CDKGit commands over SSH (Windows and Linux) (Optional)

Note: Allowing Git commands over SSH will save you from having to enter your Gitlab credentials for each commit.
- On your dev EC2, open a terminal and type
ssh-keygen-ted25519 - Press Enter until the end
- Copy the content of
id_ed25519.pub- On linux:
~/.ssh/id_ed25519.pub - On Windows:
C:\Users\Administrator\.ssh\id_ed25519.pub
- On linux:
- On Gitlab, click on your avatar and Edit profile

- In the left panel, click on SSH Keys
- Click on Add new key
- Paste your key copied in step 3
- Modify the Expiration date field if necessary
- Click on Add key
If you created your repository with an HTTPS git clone, you will have to reclone it with an SSH git clone
Add the certificate to your EC2 (Linux Only) (Optional)
Note: The AWS Transform for mainframe certificate is automatically added to the Dev windows EC2s. This step is for Linux EC2s
- Go to the AWS Certificate Manager (ACM) console
- In the left panel, click on List certificates
- Click on the Certificate ID where the Domain name is
*.bluage.local - In the top right, click on Export
- Type
gitlabfor the passphrase - Tick the Billing acknowledgment box
- Click on Generate PEM Encoding
- Copy the Certificate chain and paste it in
/etc/pki/ca-trust/source/anchors/gitlab.crtof your EC2. - Run the command
update-ca-trust