Setup the Testing Pipeline
Set up AWS Transform for mainframe refactor tools (Mandatory)
If you need the AWS Transform for mainframe Compare Tool or the AWS Transform for mainframe Data Migrator. You will need to upload the zip file of the tool in the correct S3 bucket.
AWS Transform for mainframe Compare Tool
Note: There are 2 approches, one involves decompressing then recompressing the zip file, while the other directly modifies the zip file. Below is the method for directly modifying the zip file.
- Download the AWS Transform for mainframe Compare Tool zip file on AWS Transform for mainframe refactor.
- Download the required drivers from the official MSSQL, Oracle or PostgreSQL websites depending on the database you are using for your test cases.
- Modify the AWS Transform for mainframe Compare Tool zip file, at the root level, create a folder named
drivers. Inside this folder, create a subfolder based on the database you are using:drivers/Postgresdrivers/DB2drivers/MySqldrivers/Oracledrivers/SqlServer
- Place the appropriate driver
.jarfile inside the corresponding subfolder. - Rename the zip file to
AwsBluAgeCompareTool.zip.
Note: Ensure that when unzipping the zip file, the same tree structure applies as the original zip, but with the additional
driversfolder of course.
- Upload the zip file on the client account in the folder
s3://s3-<AWS_REGION>-tools-<AWS_ACCOUNT_ID>/compare-tool/
AWS Transform for mainframe Data Migrator
Follow the same steps as AWS Transform for mainframe Compare Tool. However, rename the zip file to AwsBluAgeDataMigrator.zip and upload it to the folder s3://s3-<AWS_REGION>-tools-<AWS_ACCOUNT_ID>/data-migrator/
Configure Jenkins (Mandatory)
Normally, at the end of the Testing Pipeline CDK, the Jenkins pipeline started the Jenkins container, so you should be able to connect to Jenkins.
Connect to your developer Windows EC2 and open
https://jenkins.bluage.localConfigure System
- On the left panel, click on Manage Jenkins and then System
- Modify the field # of executors=0
Save the page
Installed plugin
- As the VPC does not have internet, plugins are already installed. Here is the list of the plugins already installed:
- Amazon Elastic Container Service (ECS) / Fargate plugin
- HTML Publisher plugin
- Role-based Authorization Strategy
- Workspace Cleanup
- Nested View Plugin
- Instance Identity
Note: Website gathering all the available plugins -> https://updates.jenkins-ci.org/download/plugins/
Configure Security
- On the left panel, click on Manage Jenkins and then Security
- In Security Realm select Jenkin’s own user database
- In Authorization select Role-Based Strategy
- Save the page
You will have to register the admin user. Let’s create admin/admin, this user will be deleted later.
Create Users
- On the left panel, click on Manage Jenkins and then Users
- Click on Create User
- You can now add all the users who will use Jenkins. Usually, we use Username: and password: and then the user can change their own password at the first connection
- Don’t forget to create a user for you as we will delete admin later
Note: I recommend not creating a user guest or something equivalent. Each user should have a user created and a specific role
Configure Roles
- On the left panel, click on Manage Jenkins and then Manage and Assign Roles
- In the section Manage Roles, in Global roles, add the roles Admin, Editor, Service Account and Viewer. (Don’t delete the role admin for now)
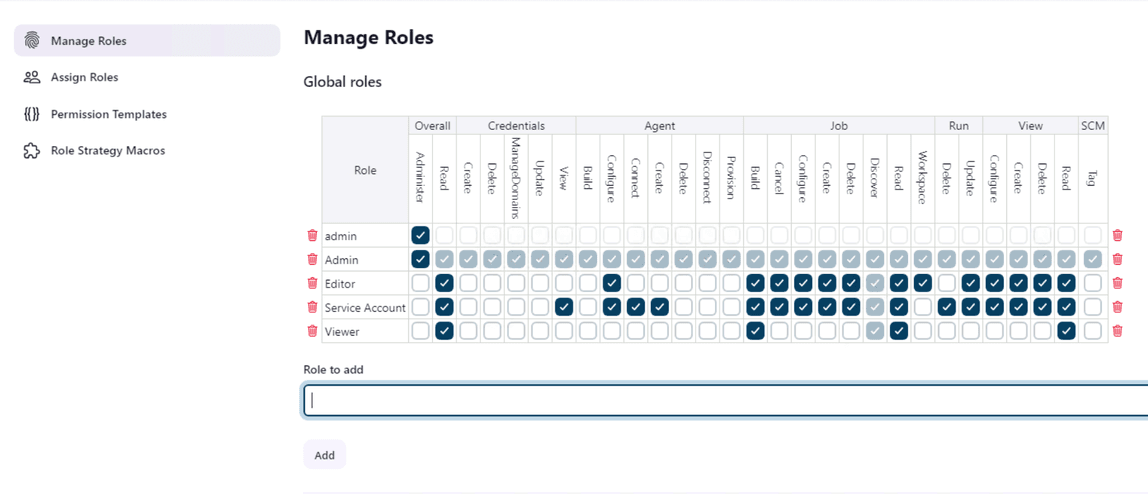
- Click on Apply at the bottom of the page and then on the left panel click on Assign Roles
- In Global roles, click on Add User and add them by entering their Username
Note: If you followed the step 3 of the Create Users section. The Username is the of the person
- Once added, select the role they should have. Usually, Developers are Editor and DevOps and Testers are Admin
- Anonymous and Authenticated Users must be nothing. Once done you can Save the page
IMPORTANT: Do not forget to create a user for you and to assign to you the role Admin because once you click on Apply the user admin won’t have any permission anymore
Now you can delete the role admin and the user admin created by Jenkins earlier
Create a user for scripts
We are going to create a user for running scripts:
- As you did before, create a new user called jenkinsAgent, you can find the password for this agent in Secret Manager (Created by the CDK scripts)
- Give this agent the role Service Account that we created in the configure Roles section earlier
- Log out and sign in using the jenkinsAgent
- Click on the name of your agent at the top right of the page and then click on Security in the left panel
- In the API Token section, click on Add new Token, type jenkinsAgent, then click on Generate
- Copy the token and paste it in the /jenkins/VARIABLES parameter store in the variable JENKINS_AGENT_API_TOKEN (This variable already exist but is empty)
Configure the Jenkins cloud
- In the left panel, click on Manage Jenkins and then Clouds
- Click on New Cloud
- Select Amazon EC2 Container Service Cloud and type your cloud name (e.g jenkins-cloud) and then click on Create
- Click on Show More
- In Amazon ECS Region Name, select your region
- In ECS Cluster choose
ecs-cluster-jenkins-nodes - Click on Advanced
- In ECS task creation timeout type 300, tick Retain Agent, in Container Cleanup Timeout type 1 and in ECS task polling interval type 1
Note: You can have an error from Jenkins at this stage, just click on it and the error will vanish
- In ECS agent templates, click on Add
- In Label type
ALL, in Task Definition Override typeecs-task-jenkins-node - Tick the box Default Capacity Provider
- Save the page
Note: If you cannot create an agent at the end of the cloud configuration. Try to delete
jenkins-cloudand recreate it
Increase the number of test cases in parallel (Optional)
Increase the number of Jenkins nodes
If you want to run more test cases, you need to have more Jenkins nodes able to run a test. Each node can run a test and you can deploy multiple nodes on an EC2
- Go to the EC2 console
- On the left panel, click on Auto Scaling Groups
- Then click on the jenkins-node ASG and modify the Desired, Minimum and Maximum capacity.
Note: These 3 options must be configure at the same value because so far we are in static mode (e.g 6 for each). Later I will set up scaling out and scale in configuration which requires to adapt some scripts to have a stable pipeline.
Increase the number of tomcat servers
With the previous step, you learned how to increase the number of Jenkins nodes. But if you cannot deploy as many Tomcat servers as Jenkins nodes, it’s useless. So, for increasing it:
- Go to the EC2 console
- On the left panel, click on Auto Scaling Groups
- Then click on the test-cases ASG and modify the Desired, Minimum and Maximum capacity.
Note: The number of tomcat server you can deploy on a cluster must always be higher than the number of Jenkins nodes. This parameter only depends on the ASG capacity.
Note2: This cluster is able to scale automatically, so you can define 1 as Desired and Minimum capacity and 5 for Maximum capacity for instance. You are not forced to have the 3 capacities at the same value. Be frugal, save money!
Increase the number of Chrome node
If you increase the number of test cases that you can run in parallel, you also need to increase the number of Selenium tests that you can run and for that you need to give the Selenium hub more Chrome nodes.
Note: You need to know that each Chrome node can run 2 Selenium tests
- Go to the ECS console
- Click on the ecs-cluster-selenium-chrome-nodes cluster
- Select the service and update it
- Modify the Desired tasks field. This will increase the number of chrome node container
Note: Be careful, you can only run 3 Chrome nodes by EC2, so you maybe need to increase the number of EC2s before increasing the number of Chrome node. See how to increase the number of EC2s by modifying the Auto Scaling Group how we did it above but with the selenium-chrome-nodes ASG