Development Environment
Overview
This document explains how to install the modernized application in a Windows development environment and run the application in a debug mode. All examples are based on Card Demo. To run this guide Card Demo (COBOL) code should have been modernized and ready to download from AWS Transform for mainframe refactor Transformation Center.
Prerequisites
AWS Transform for mainframe Standard Delivery environment (SDE) installed on your AWS Account.
Windows Development environment set up:
- Log into AWS Web Console, with sufficient privilege to create EC2 instances.
- Go to EC2 service, from the EC2 dashboard select “Launch Instance” > “Launch instance from template”. This guide explains in detail how to create the instance: SDE DevOps Setup - Project Manager Guide
- Log into the windows instance, either using Fleet Manager remote session or set up a Microsoft Remote Desktop using AWS CLI with SSM port forwarding. Please read https://docs.aws.amazon.com/systems-manager/latest/userguide/session-manager-working-with-sessions-start.html to set up port forwarding to 3389 (Microsoft RDP)
- Once logged into the Windows instance, we will find all necessary tools to install, run & debug the modernized application.
Default Windows tools installation
- Maven: Used to compile & package the modernized application.
- Located in
C:\Apache\maven-3.9
- Located in
- Apache Tomcat: Java server to host the modernized application.
- Located in
C:\Apache\Tomcat10
- Located in
- Eclipse: developer user interface to run the modernized application.
- PostgreSQL server with PgAdmin
- Amazon Corretto Java 17 SDK
Configuration steps: Maven
- Maven, make sure maven is properly installed and configured. Open a windows command line and run:
mvn --version
This should output (it will also validate the Java installation):
Apache Maven 3.9.6 (bc0240f3c744dd6b6ec2920b3cd08dcc295161ae)
Maven home: C:\Apache\maven-3.9
Java version: 17.0.12, vendor: Amazon.com Inc., runtime: C:\Program Files\Amazon Corretto\jdk17.0.12_7
Default locale: en_US, platform encoding: Cp1252
OS name: "windows server 2022", version: "10.0", arch: "amd64", family: "windows"
- Setting up maven repository: in AWS Web Console got to CodeArtifact and the select maven repository:


- Click on “View connection instructions”, this page give all details for maven to connect to CodeArtifact.

- Build the
settings.xml(located in C:\Users\Administrator.m2\settings.xml). This file will be used by maven to fetch all jars & pom files.
Sample settings.xml (make sure to replace project name & account id, highlighted in yellow below)
<settings>
<mirrors>
<mirror>
<id>card-demo-maven-central-store</id>
<name>card-demo-maven-central-store</name>
<url>https://card-demo-851725413617.d.codeartifact.eu-west-3.amazonaws.com/maven/maven-central-store/</url>
<mirrorOf>*</mirrorOf>
</mirror>
</mirrors>
<servers>
<server>
<id>card-demo-maven-central-store</id>
<username>aws</username>
<password>
`${env.CODEARTIFACT_AUTH_TOKEN}`
</password>
</server>
</servers>
<profiles>
<profile>
<id>card-demo-maven-central-store</id>
<repositories>
<repository>
<id>card-demo-maven-central-store</id>
<url>https://card-demo-851725413617.d.codeartifact.eu-west-3.amazonaws.com/maven/maven-central-store/</url>
</repository>
</repositories>
</profile>
</profiles>
<activeProfiles>
<activeProfile>card-demo-maven-central-store</activeProfile>
</activeProfiles>
</settings>
- CodeArtifact credentials, this will replace
${env.CODEARTIFACT_AUTH_TOKEN}
Sample getting authorization token. This comand is obtained from AWS web console, when selecting the repository in CodeArtifact service:
FOR /F "tokens=*" %g IN ('aws codeartifact get-authorization-token --domain card-demo --domain-owner 851725413617 --region eu-west-3 --query authorizationToken --output text') do (SET CODEARTIFACT_AUTH_TOKEN=%g)
Note the environment variable does not work with Eclipse. It’s simpler to replace
${env.CODEARTIFACT_AUTH_TOKEN}directly with the token insettings.xml.
To directly copy to clipboard the token run the command: echo %CODEARTIFACT_AUTH_TOKEN% | clip.
Note Eclipse does not interpret the environment variable
%CODEARTIFACT_AUTH_TOKEN%it’s better to replace it in settings.xml before opening Eclipse.Installing the modernized code
As a prerequisite, the application code must be transformed in AWS Transform for mainframe and uploaded to Windows instances. The samples provided below are based on the result of Blu Insight L3 Workshop: https://catalog.workshops.aws/aws-blu-age-l3-certification-workshop/en-US/introduction
Prerequisites
- Access to https://gitlab.bluage.local - Gitlab
- Access to https://jenkins.bluage.local - Jenkins
- Access to https://sonarqube.bluage.local - SonarQube
- Access to https://dws-manager.bluage.local - SDE RTS Manager
- Access to https://bluinsights.aws - AWS Transform for mainframe refactor
- This can be accessed with AWS Console, from
AWS Mainframe Modernization / Tools.- The URL will change depending on AWS region for example for us-east-1 the URL will be https://us-east-1.bluinsights.aws).
- Access to AWS Secrets Manager keys:
- /sonar/admin (sonarqube credential)
- /gitlab/root (Gitlab credential)
- /rts/db/master (Postgres master password)
- /rts/user/devops (RTS devops password)
Downloading code from AWS Transform for mainframe refactor
Once the existing application is transformed it can be downloaded and installed on the Windows instance. Depending on the requirement, AWS Transform for mainframe refactor can be directly access from Windows instance inside the AWS Account VPC or downloaded from to another external environment and copied to Windows instance.
In case there is no access to AWS Web Console from the AWS Account VPC, AWS Transform for mainframe refactor login URL can be obtain using AWS CLI: https://docs.aws.amazon.com/cli/latest/reference/m2/get-signed-bluinsights-url.html
Example to get login URL from AWS CLI:
On your laptop copy & paste AWS temporary credentials in a terminal console and then execute the following command:
aws m2 get-signed-bluinsights-url —region us-east-1
This will output a login URL:
{
"signedBiUrl": "[https://bluinsights.aws/app/api/auth/console-redirect/](https://bluinsights.aws/app/api/auth/console-redirect/eyJhbGciOiJIUzI1NiIsInR5cCI6IkpXVCJ9.eyJhcm4iOiJhcm46YXdzOnN0czo6MjUyODA3MTY2OTgwOmFzc3VtZWQtcm9sZS9BZG1pbi9uZXZldXhqLUlzZW5nYXJkIiwicmVnaW9uIjoidXMtZWFzdC0xIiwiZXhwIjoxNzMwMDIyMDA2fQ.td97WcV5mVlMk8i6GNS8Wfkv7fPPq0VGVMb3ARLEm9Q)<TOKEN>"
}
This URL can be then reused in AWS Account Windows instance (providing the *.bluinsights.aws URI is accessible from the AWS VPC)
From AWS Transform for mainframe refactor download the transformed code.
Select “Transformation Center”, then your project.


Then select transform, then select all from your “transformation” and click download.

Place the archive on Windows file system, and un-zip it.
Note copy the archive in a folder structure as the archive contains long name and could lead to path limit error when extracting copying. For example: C:\dev\bi.
Clone pre-configured Repository from GitLab.
In these steps, pre-configured git repository is cloned on Windows instance and the transformed code is placed in those repositories and then pulish to GitLab.
Setting up Gitlab accounts
Using “root” credential in Gitlab, create an account (different accounts will be needed for each team member).
- Get the root account from AWS Secrets Manager: /gitlab/root.
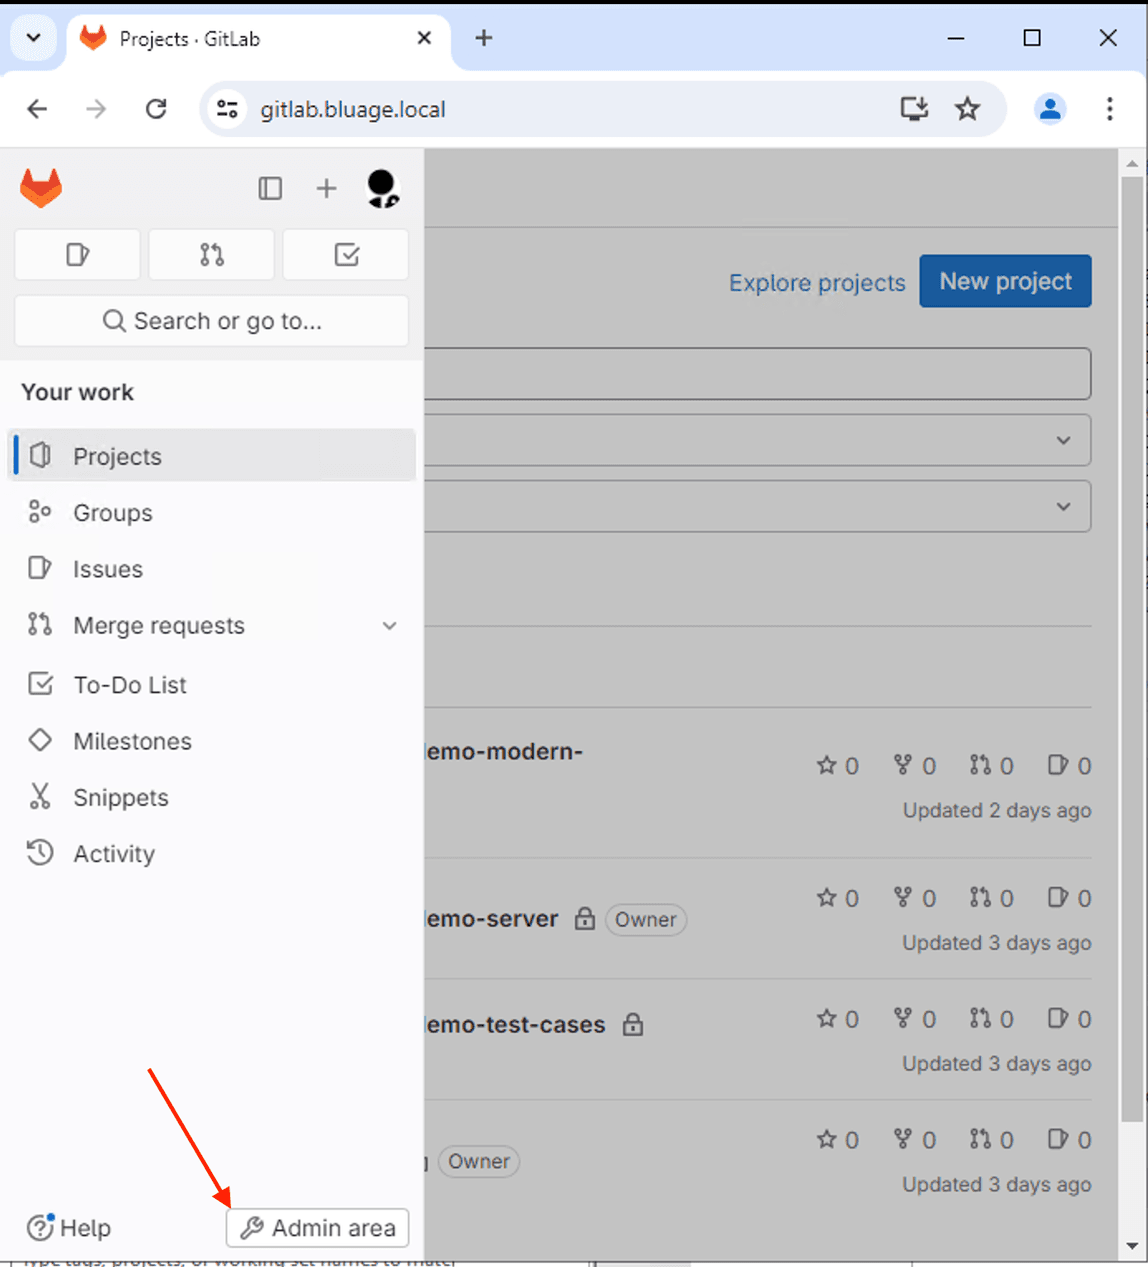
- Login in https://gitlab.bluage.local
- Add a user, click “Admin Area”
- After the “new user” is created add them to the following projects: modern-application, server, .

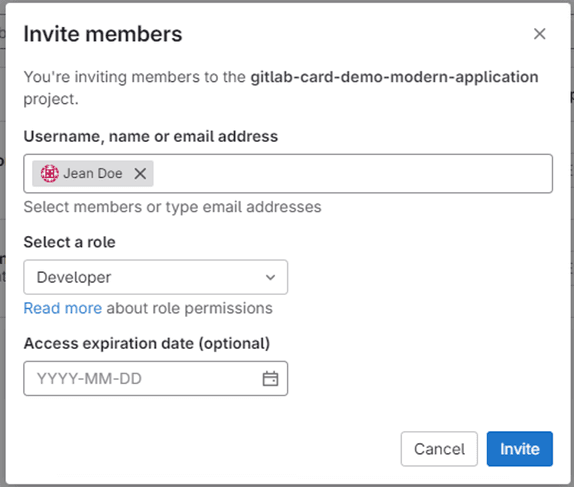
- https://gitlab.bluage.local/developers/gitlab-card-demo-modern-application/-/project_members
- https://gitlab.bluage.local/developers/gitlab-card-demo-server/-/project_members
- https://gitlab.bluage.local/developers/gitlab-card-demo-test-cases/-/project_members
Setting up repository access with SSH credential
- Logout and re-log with the new user.
- Open a windows command and create an SSH key in Windows instance using:
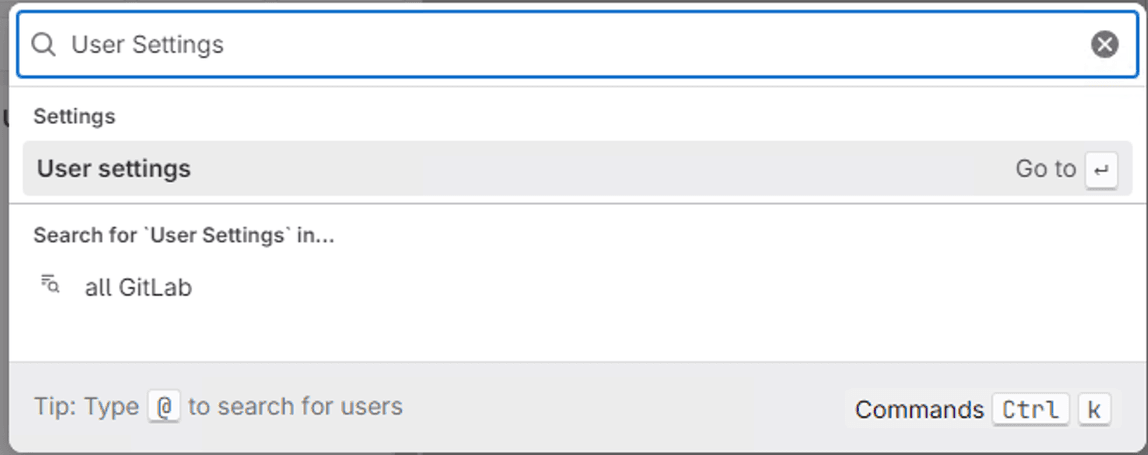
ssh-keygen -t ed25519 -C "my user name". Then copy the public SSH key fromC:\Users\Administrator\.ssh\id_ed25519.pub - In GitLab search for “User Settings”, select menu “SSH Keys” (https://gitlab.bluage.local/-/user_settings/profile)
Click on new user:
Enter the user details.
Note the new user will need to enter a new password at first login.

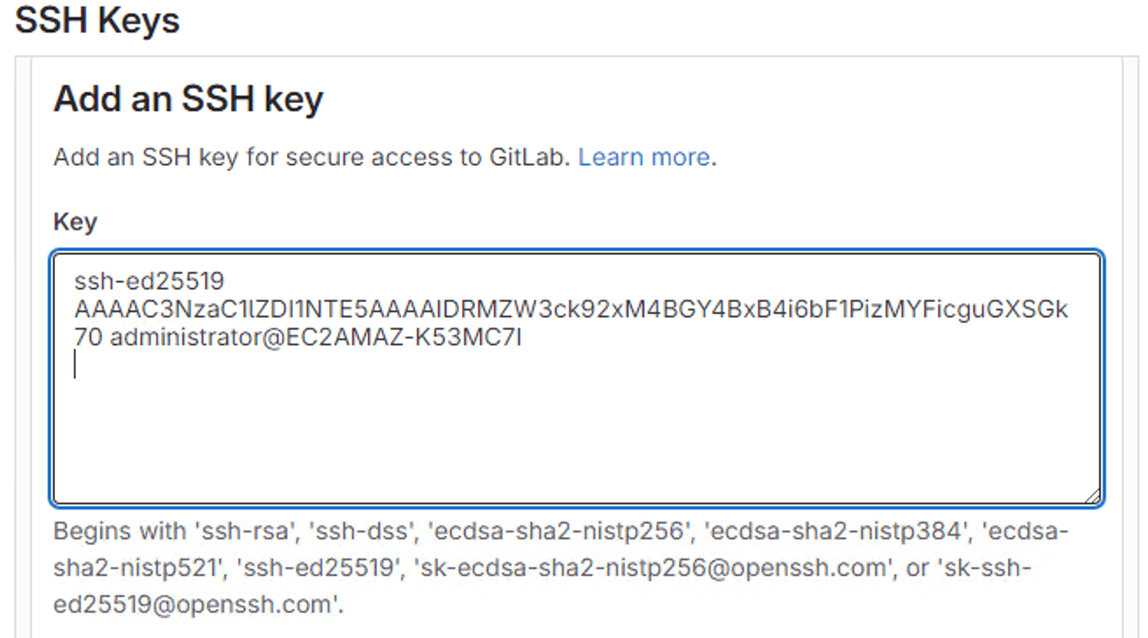
Save the SSH Key
Cloning repositories
In these steps you will need to clone 3 repositories: modern-application, server and tests-cases.
- In GitLab for each project:

- Copy the clone URL

- In windows open a command window in correct folder structure (for example: C:\dev\git) do git clone:
Sample commands to clone all repositories:
git clone git@gitlab.bluage.local:developers/gitlab-card-demo-modern-application.git
Getting the AWS Transform for mainframe Runtime
The AWS Transform for mainframe Runtime is accessible from AWS Transform for mainframe refactor Toolbox.
For example:
- Download AWS Transform for mainframe Runtime and uncompress it into
C:\dev\gapwalk Install the runtime locally in maven local repository.
Note : Before starting this operation CodeArtifact credentials must be obtain (see Configuration steps: Maven).
- Change Directory to
C:\dev\gapwalk\gapwalk-4.4.0-alpha.16\shared - Launch the command:
_install-velocity-runtime.cmd
Modernized application code installation & compilation
Copy the uncompressed archive previously downloaded from AWS Transform for mainframe refactor (see Downloading code from AWS Transform for mainframe refactor) into the cloned code from gitlab-<application name>-modernized-application:

Open a command line and run maven install: C:\dev\git\gitlab-card-demo-modern-application\card-pom>mvn install
It should end with:
[INFO] Reactor Summary for card-demo-pom 1.0.0:
[INFO]
[INFO] card-demo-pom ...................................... SUCCESS [ 0.380 s]
[INFO] card-demo-tools .................................... SUCCESS [ 6.747 s]
[INFO] card-demo-entities ................................. SUCCESS [ 14.996 s]
[INFO] card-demo-service .................................. SUCCESS [ 8.457 s]
[INFO] card-demo-web ...................................... SUCCESS [04:32 min]
[INFO] ------------------------------------------------------------------------
[INFO] BUILD SUCCESS
[INFO] ------------------------------------------------------------------------
[INFO] Total time: 05:03 min
[INFO] Finished at: 2024-10-28T09:07:34Z
[INFO] ------------------------------------------------------------------------
Commit the code and push to GitLab
Before committing and pushing code, verify there is a .gitignore file at the repository root. Below is an example:C:\dev\git\gitlab-card-demo-modern-application\.gitignore
node_modules
target
.settings
.project
.classpath
dist
cache
In the same folder C:\dev\git\gitlab-card-demo-modern-application. Run the git commands:
git add .
git commit -m “Initial commit, adding code”
git push
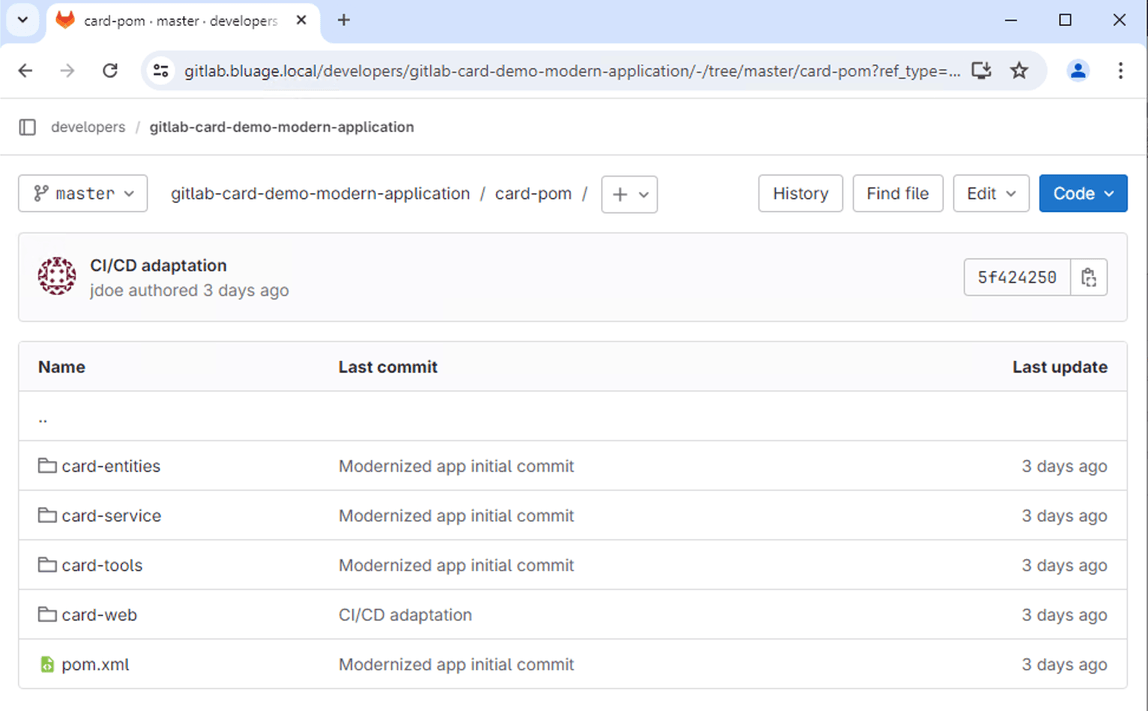
Check the code on GitLab, the default branch is master.
Installing modernized application in Eclipse
Before starting make sure maven settings.xml is properly configured with CodeArtifact authentication token (see Configuration steps: Maven)
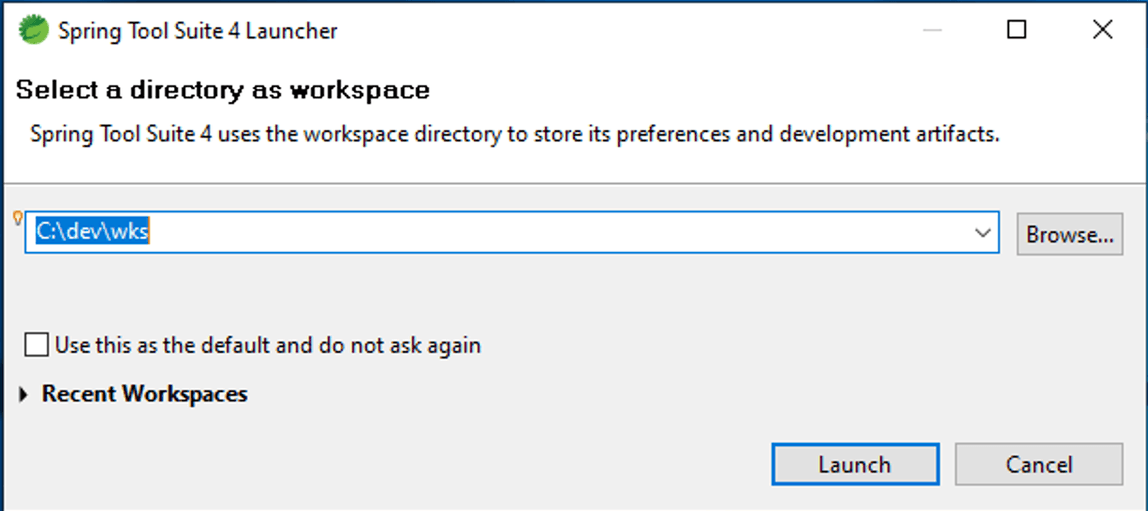
Launch Eclipse Spring Tool Suite and select a workspace (C:\dev\wks)
Configure Eclipse Java environment & Apache Tomcat 10.1
Java configuration
In Eclipse open Windows > Preferences:
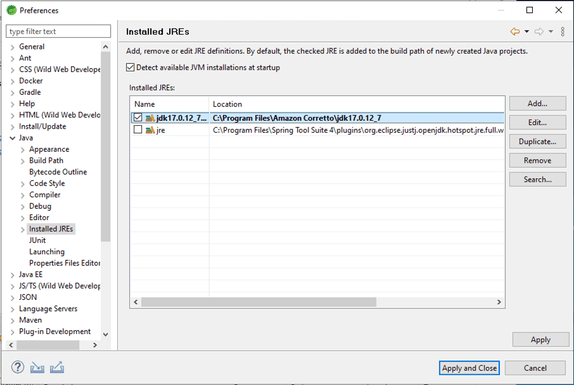
- Java > Installed JREs
- Click Add..
- Standard VM:
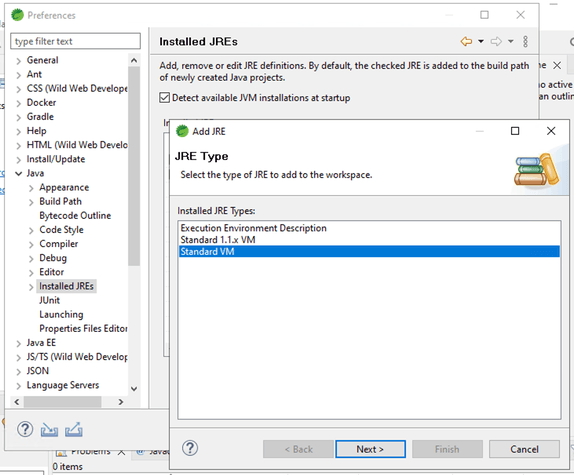
- Select Amazon Coretto Java 17 folder:

- Select this version of Java by default:
Apache Tomcat configuration
In Eclipse open Windows > Preferences:
- Select Server > Runtime Environment
- Click
Add...and selectApache Tomcat v10.1 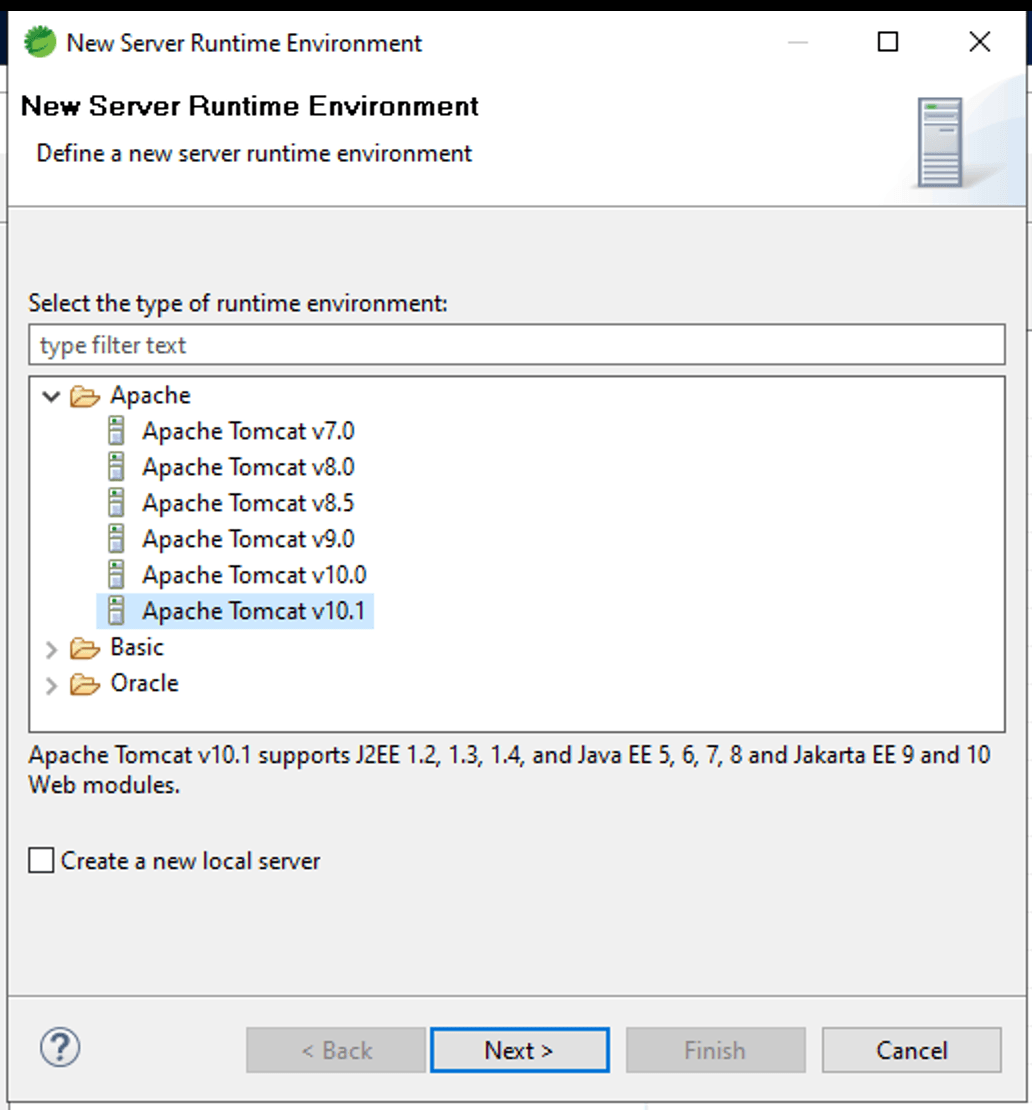
- Select
Apache Tomcat 10 - Click on Browse... then select folder:
C:\Apache\Tomcat10 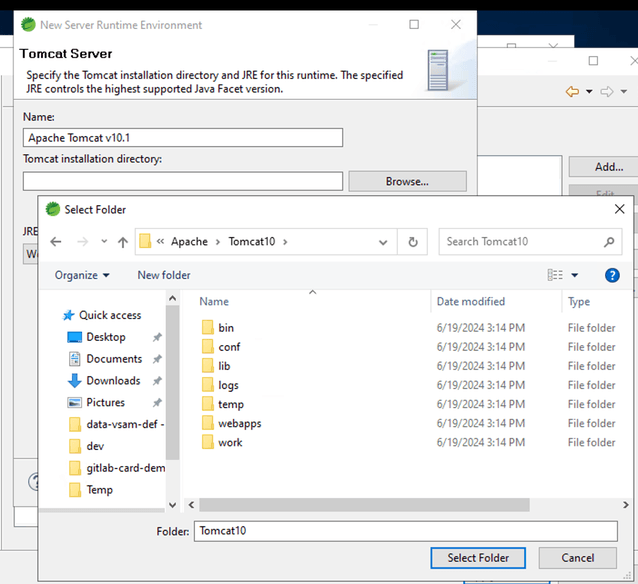
Click
FinishConfigure Apache Tomcat Server
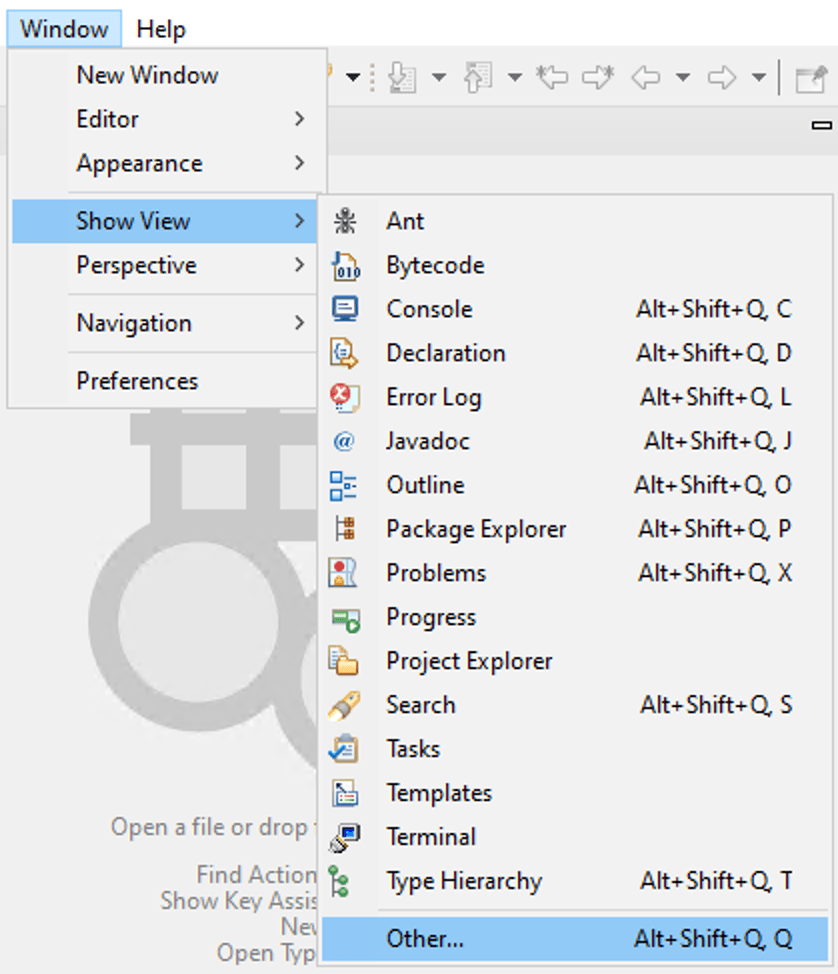
In Eclipse menu select Windows > View > Others... Then select “Servers”

In the view Servers, click on the link to create a new “Server” project:
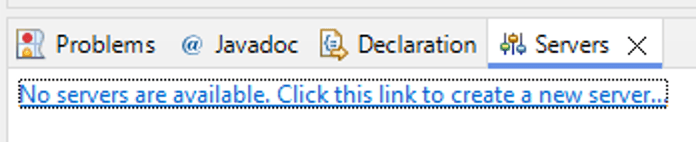
Select Apache Tomcat 10.1

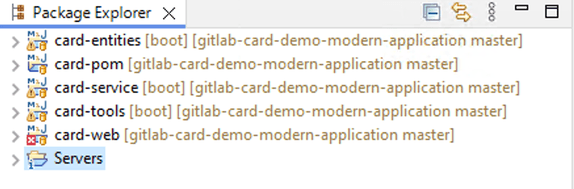
Click Finish, a new project “Server” should appear in the project or package explorer.

Server configuration for modernized application
Server creation & initial setup
From the “Servers” view double click on the server to open the server property page.
- Change the server timeout, and save.

- Set a port for “Tomcat admin port”: 9090

- Modify the project structure from the package explorer. Create imbricated folders tomcat/config and move all configuration files from “Tomcat v10.1 Server at localhost-config”.

- Update the server configuration path in the server property page. Click on the “browse...” button and then select the new “tomcat/config” folder.

- Remove the old folder “Tomcat v10.1 Server at localhost-config”. The result should be as follow:
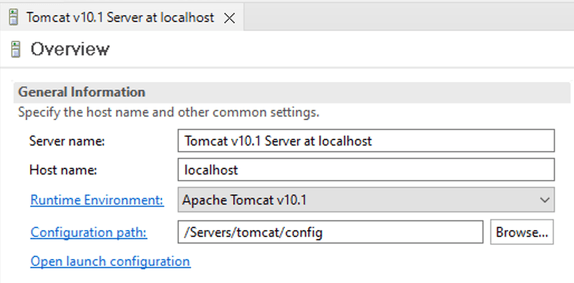
- Save the “Server property page”
Server configuration with AWS Transform for mainframe Runtime & Database
In those steps, the runtime is copied and database is configured.
Note: When editing Tomcat’s configuration make sure the Tomcat Server’s property page is closed and saved. If the property is opened and saved, it will overwrite the custom values.
Please double check everything, any miss configuration will cause issues when launching Tomcat server.
Create base folder and copying Runtime libraries:
- In “Server” project from the package explorer view, add the following folders:
- workingDir
- config
- files-dir
- gapwalk
- runtime
- webapps
- The folder structure should be as follow:

- workingDir
- Adding variables to launch configuration
- Open the “server” property page from “Servers” view.
- Click on “Open launch configuration” and select the “Arguments” tab:

- Select “Other” in the “Working directory” section. Then click on “Workspace” and select “workingDir” from the “Server” project.
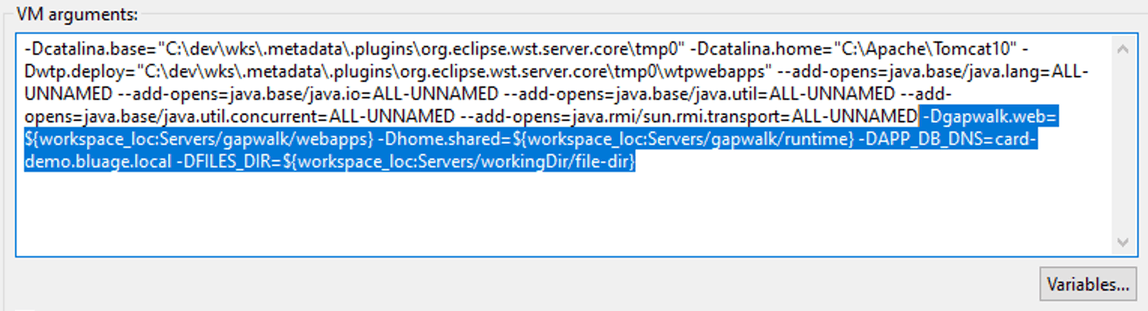
- In “VM arguments” add the following java variables (do not add line return, just add space between variables)
- Add variable for Runtime Web application:
-Dgapwalk.web=${workspace_loc:Servers/gapwalk/webapps} - Add variable for Runtime Shared libraries:
-Dhome.shared=${workspace_loc:Servers/gapwalk/runtime} - Add variable for modernized application’s database:
-DAPP_DB_DNS=card-demo.bluage.local - Add variable for the “files-dir” folder:
-DFILES_DIR=${workspace_loc:Servers/workingDir/file-dir}
- Add variable for Runtime Web application:
- The result should look like this:
- Configuring class loader in “
tomcat/config/catalina.properties”, from the package explorer edit the file and change the propertycommon.loader: - Append the following at line end:
,"{$home.shared}/","${home.shared}/*.jar", see below (there is no line return)
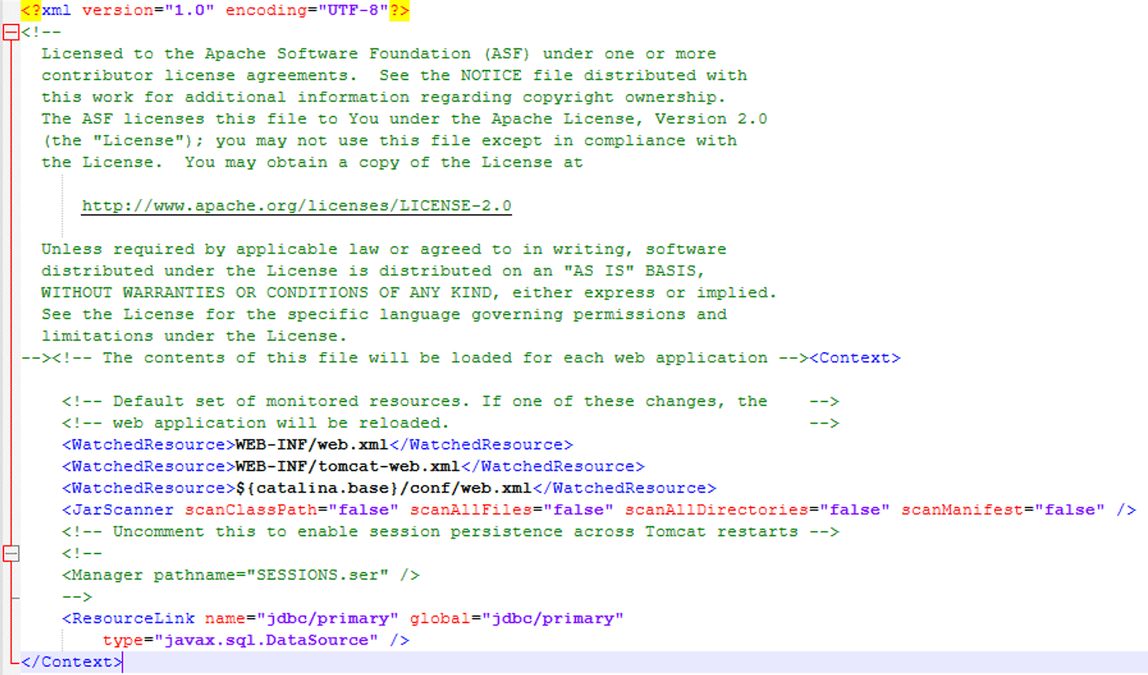
- Configuring JNDI database connections in “tomcat/config/context.xml”, add the following XML tags:
<JarScanner scanClassPath="false" scanAllFiles="false" scanAllDirectories="false" scanManifest="false" /><ResourceLink name="jdbc/primary" global="jdbc/primary" type="javax.sql.DataSource" />- Example:
- Configuring JNDI & Gapwalk Web application in “tomcat/conf/server.xml”, add the following XML tags:
- Inside
<GlobalNamingResources>add the tag:<Resource auth="Container" driverClassName="org.postgresql.Driver" initialSize="0" maxIdle="10" maxOpenPreparedStatements="-1" maxTotal="20" maxWaitMillis= "-1" name="jdbc/primary" password="card" poolPreparedStatements="true" testOnBorrow="false" type="javax.sql.DataSource" url="jdbc:postgresql://${APP_DB_DNS}:5432/card" username="card_bluesam"/> - Inside
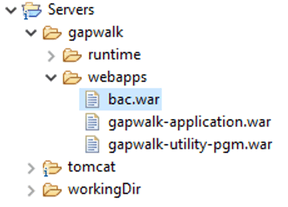
<Host>add the tags:<Context docBase="${gapwalk.web}\bac.war" path="/bac" reloadable="true"/><Context docBase="${gapwalk.web}\gapwalk-application.war" path="/gapwalk-application" reloadable="true"/><Context docBase="${gapwalk.web}\gapwalk-utility-pgm.war" path="/gapwalk-utility-pgm" reloadable="true"/>
- Make sure the end tag
</Host>is on a different line. - Fragments example “server.xml”:


- Inside
Copying AWS Transform for mainframe Runtime libraries into “Server” project
From the previous downloaded AWS Transform for mainframe Runtime for Developers
From the uncompress archive, copy the following:
- Copy
<runtime version>/velocity/shared/*.*** to **Server/gapwalk/runtime/

- Copy
<runtime version>/velocity/webapps/*.*toServer/gapwalk/web/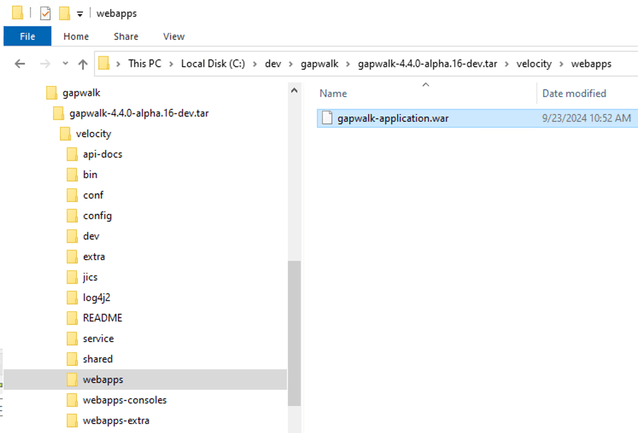
- Copy
**<runtime version>/webapps-extra/gapwalk-utility-pgm.wartoServer/gapwalk/web. Note depending on the existing application technology you might need gapwalk-cl-command.war instead.
- Copy
**<runtime version>/webapps-consoles/bac.wartoServer/gapwalk/web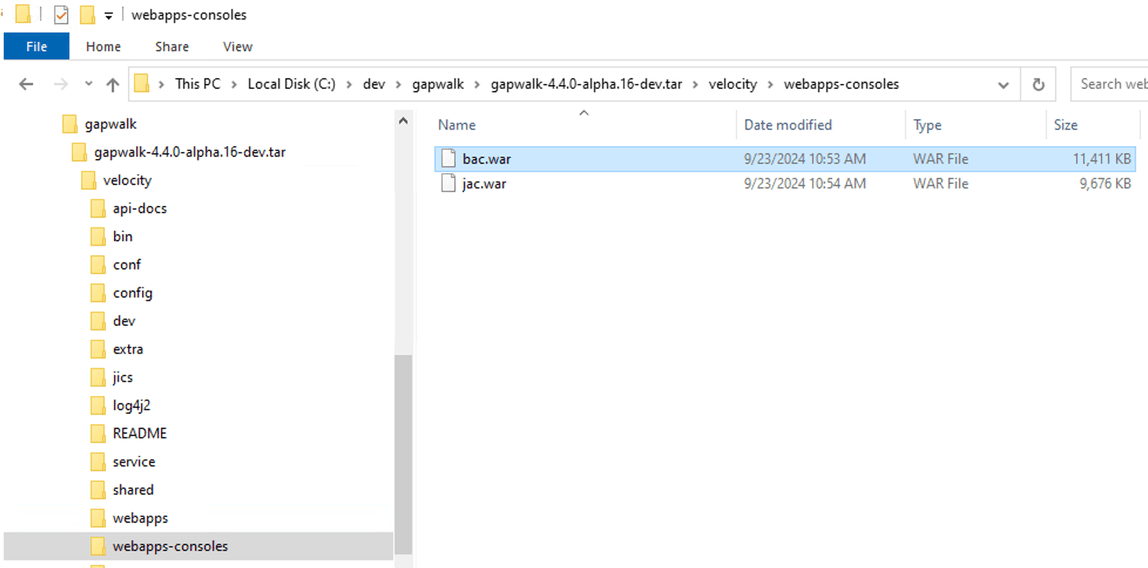
- The result should look like this:
Application configuration for Apache Tomcat server
In this section Gapwalk web application, and the modernized application is configured.
- In Tomcat “Server” project, create the application YAML configuration as follow Server/workingDir/configuration/application-card.yml:
application-card.yml
# Logback context logger integration.
logging:
config: file:./config/logback/logback.xml
level.com.netfective.bluage.gapwalk: ERROR
level.com.fujitsu.takashimaya.program: ERROR
level.com.fujitsu.takashimaya.program.job.scripts.GroovyExecution: INFO
level.org.springframework.statemachine.support: WARN
level.org.springframework.transaction.interceptor: ERROR
level.org.springframework.transaction: ERROR

# If the datasource support mode is not static-xa, spring JTA transactions autoconfiguration must me disabled
spring.jta.enabled : false

spring.jpa.show-sql: false
- Create gapwalk web configuration file as follow Server/workingDir/application-main.yml;
application-main.yml
logging:
config: file:./config/logback/logback.xml
level.org.springframework.beans.factory.support.DefaultListableBeanFactory : WARN
level.com.netfective.bluage.gapwalk.rt.blu4iv.dao.DataAccess : DEBUG
level.org.springframework.jdbc.core.JdbcTemplate : DEBUG
level.com.netfective.bluage.gapwalk.rt.db.GwJdbcTemplate : DEBUG
level.com.netfective.bluage.gapwalk.database.support.cursor : DEBUG
level.com.netfective.bluage.gapwalk.database.support.logging.DatabaseInteractionLoggerUtils : TRACE

spring:
quartz:
auto-startup: false
scheduler-name: Default
properties:
org.quartz.threadPool.threadCount: 1
jta:
enabled: false
atomikos.properties.maxTimeout : 600000
atomikos.properties.default-jta-timeout : 100000
jpa:
open-in-view: false
properties.hibernate.temp.use_jdbc_metadata_defaults : false
database-platform : org.hibernate.dialect.PostgreSQLDialect # org.hibernate.dialect.PostgreSQLDialect, org.hibernate.dialect.SQLServerDialect

datasource:
jicsDs:
driver-class-name : org.postgresql.Driver # org.postgresql.Driver, com.microsoft.sqlserver.jdbc.SQLServerDriver
url: jdbc:postgresql://${APP_DB_DNS}/card_jics # jdbc:postgresql://localhost:5433/jics, jdbc:sqlserver://localhost\SQLEXPRESS:1434;databasename=jics;
username: card
password: card
type : org.postgresql.ds.PGSimpleDataSource # org.postgresql.ds.PGSimpleDataSource, com.microsoft.sqlserver.jdbc.SQLServerDataSource

bluesamDs :
driver-class-name : org.postgresql.Driver # org.postgresql.Driver, com.microsoft.sqlserver.jdbc.SQLServerDriver
url : jdbc:postgresql://${APP_DB_DNS}/card_bluesam # jdbc:postgresql://localhost:5433/jics, jdbc:sqlserver://localhost\SQLEXPRESS:1434;databasename=jics;
username : card
password : card
type : org.postgresql.ds.PGSimpleDataSource # org.postgresql.ds.PGSimpleDataSource, com.microsoft.sqlserver.jdbc.SQLServerDataSource

filesDirectory : ${FILES_DIR}
- Create SLF4J log back configuration files.
- Create folder “
logbak” inServer/workingDir/configuration: - Create file “logback.xml”
```
<?xml version="1.0" encoding="UTF-8"?>
<!DOCTYPE XML>
- Create “logback-definitions.xml” - <?xml version="1.0" encoding="UTF-8"?>
${DEFAULT_LOG_PATTERN}
${DEFAULT_CHARSET}
jobDiscriminator
default_main
${LOG_OUTPUT_PATH}/${jobDiscriminator}.log
${DEFAULT_LOG_PATTERN}
${DEFAULT_CHARSET}
progDiscriminator
default_prog
${LOG_OUTPUT_PATH}/${progDiscriminator}.log
%msg%n
${DEFAULT_CHARSET}
true
${LOG_OUTPUTPATH}\log%d{yyyy-MM-dd}_%i.log
100MB
100
10GB
${DEFAULT_LOG_PATTERN}
${DEFAULT_CHARSET}
</included>
```
- The folder structure should similar to this:

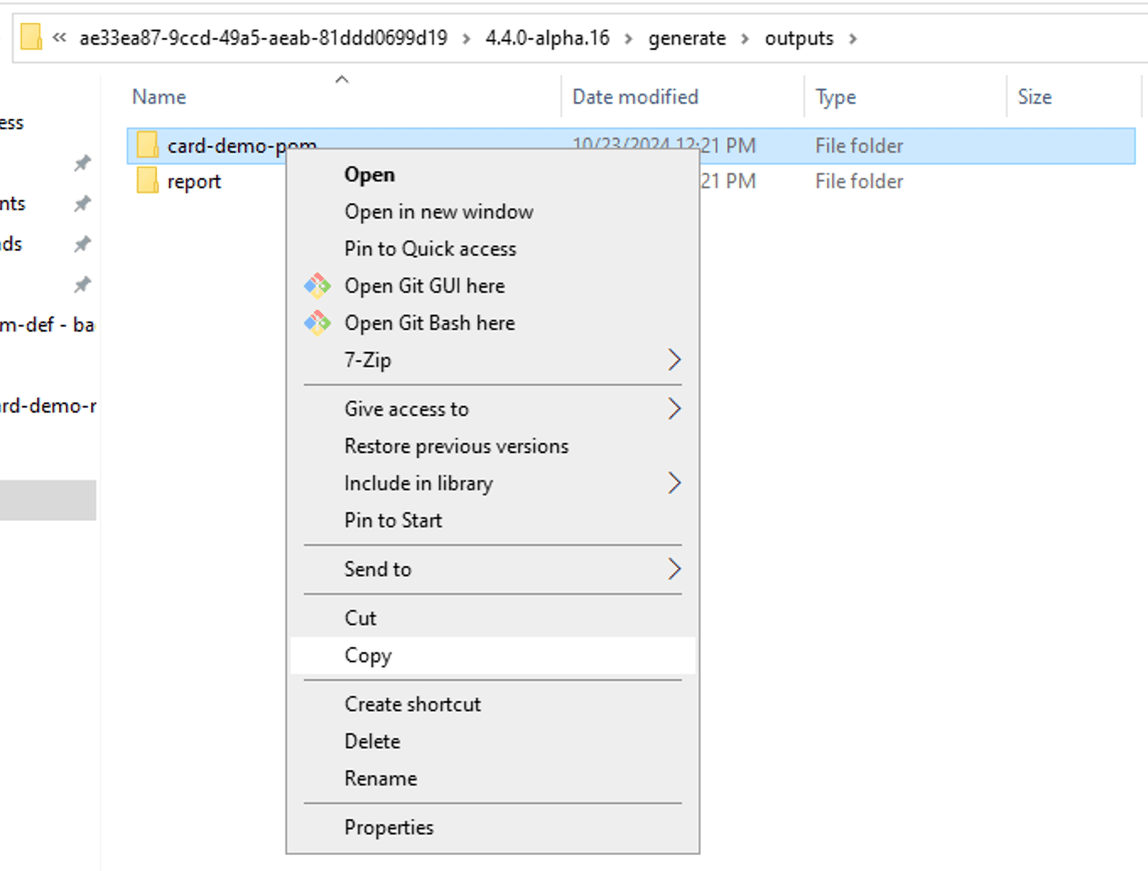
- Copy the groovy scripts from AWS Transform for mainframe refactor archive:
<uncompressed archive path>\generate\outputs\card-demo-pom\card-demo-service\src\main\resources\scriptsintoServers/workingDir/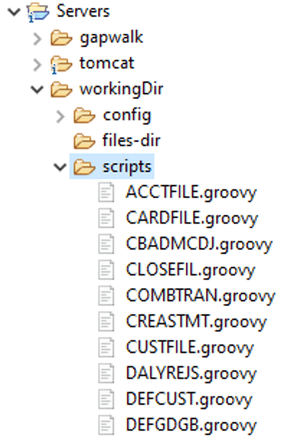
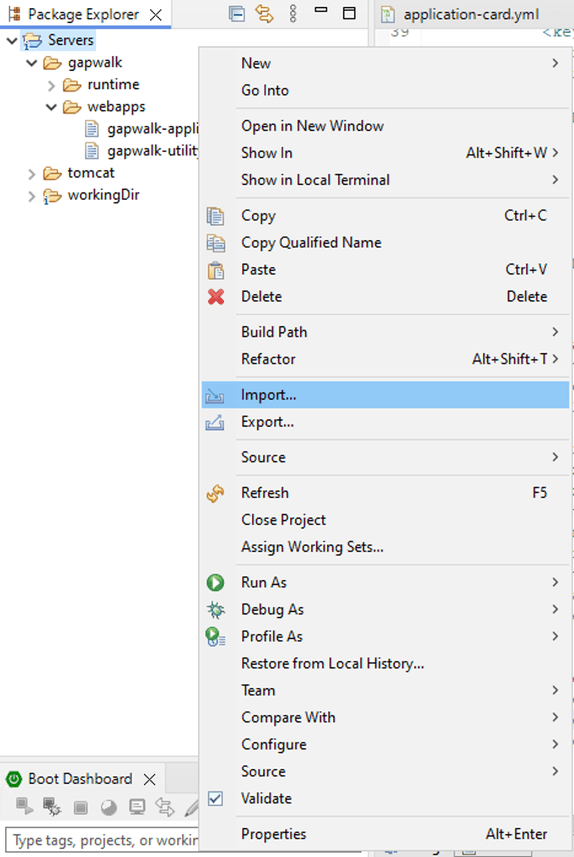
Import “Maven” project into workspace
This section covers importing the transformed application from the local git repository.
- In Eclipse right click on “Package explorer” and select import then “Maven” > “Existing Maven projects”

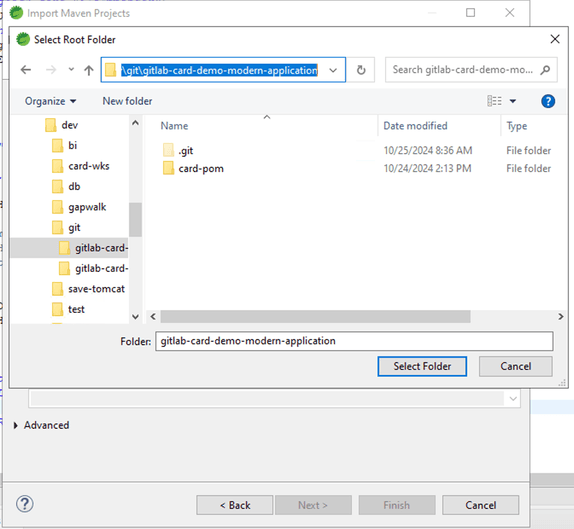
- Select the root folder from C:\dev\git\gitlab-card-demo-modern-application
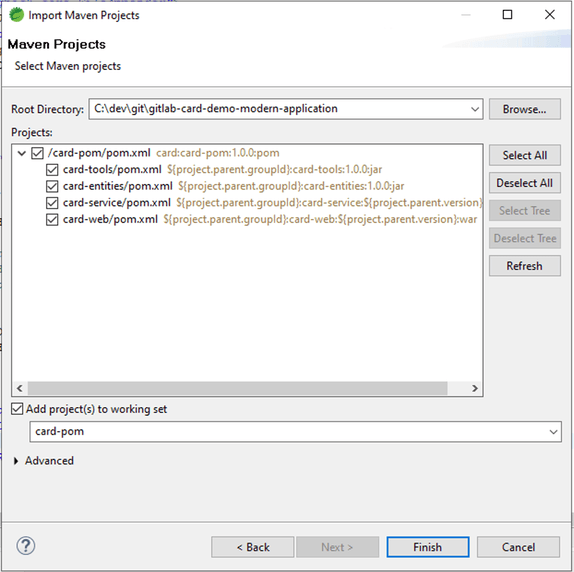
- Result
Note card-web contains error on “json2” files. Eclipse does not support this format, and these errors can be ignored.
Last step before launching the application
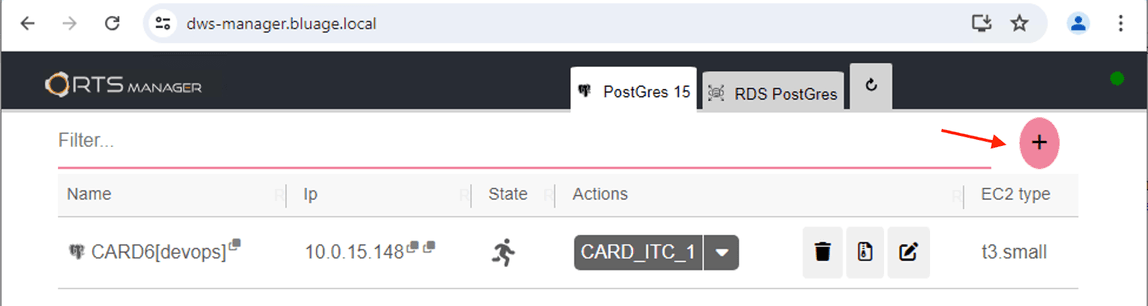
Open SDE Regression Testing Snapshots Manager: https://dws-manager.bluage.local. Create a database server card-demo. You will need get the credentials from AWS Secrets Manager rts/user/devops. Once logged into RTS Manager create the database with a new volume. See this user guide for more detailed instruction: SDE RTS - User Guide.
- Click on the (+) icon to create a server
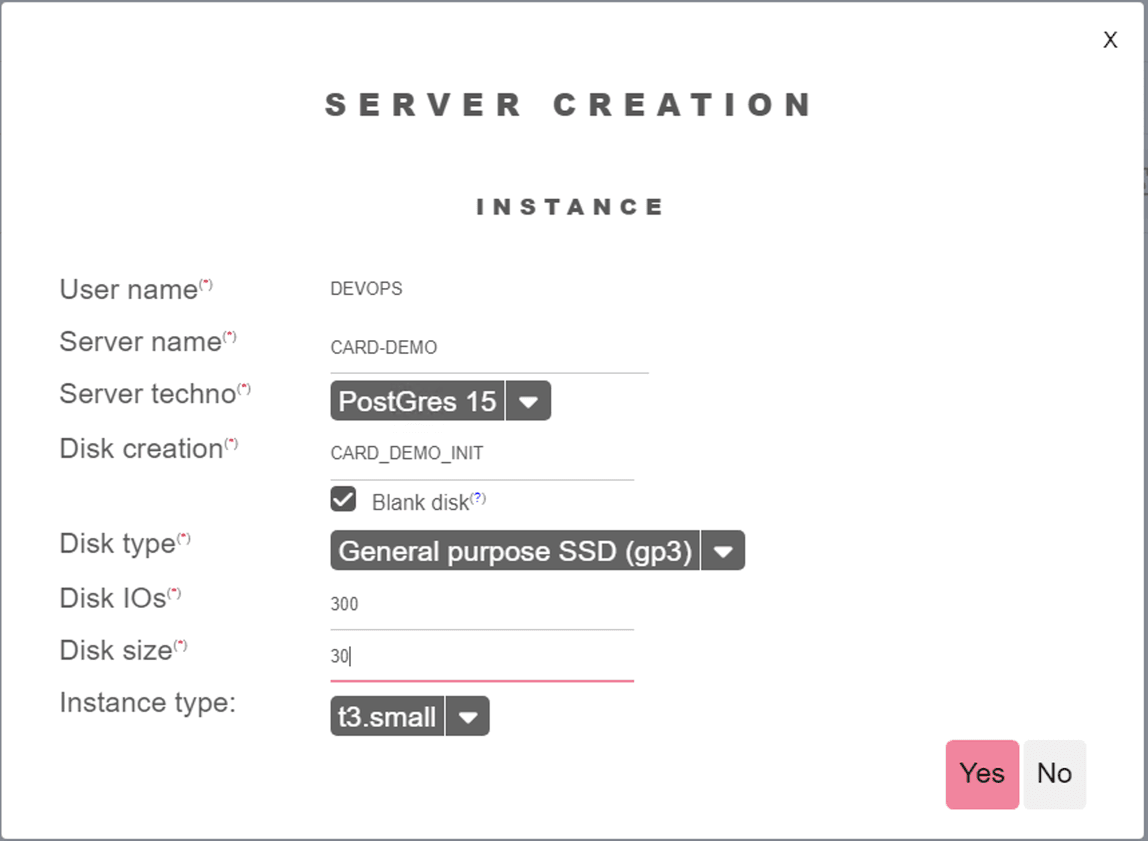
- Then enter the following parameter:
- Click “yes” this should take 2 or 3min for the server to be created. The created server will contain an initial Postgres database.
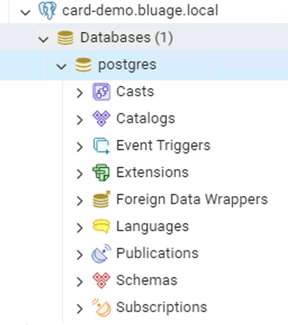
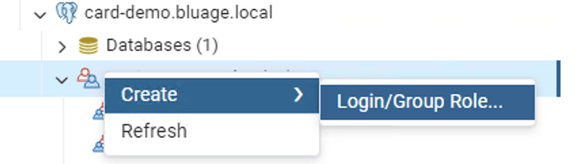
- Use pgAdmin to connect to the database server, the password for postgres user can be found in AWS Secrets Manager’s key:
- Click “Save”
- Create a user “card_bluesam” for the modernized application.
- Assign the following roles:
- Make sure the password match the configuration file (defined here: Configuring JNDI & Gapwalk Web application in “tomcat/conf/server.xml”, add the following XML tags:)
- Click “Save”
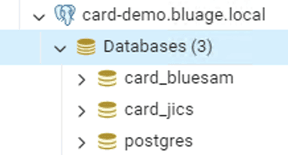
- Create databases “card_bluesam” and “card_jics” with owner “card”. Here you can chose to reuse database from AWS Transform for mainframe refactor workshop.
- From this point you can restore the SQL dump corresponding to AWS Transform for mainframe refactor or wait for the section on migrating data (TODO Link)
Switch back to Eclipse and launch Tomcat Server. Running the application with an empty database will initiliaze Blusam tables (for Cobol application).
Launching the modernized application


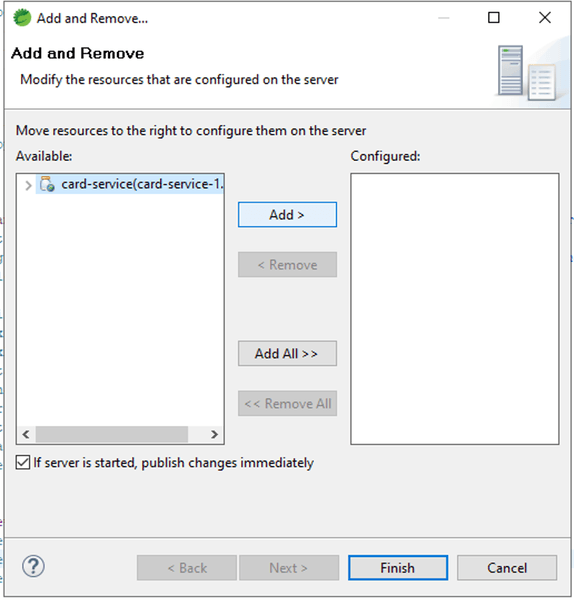
- Right on server in “Server” view and select “Add and Remove Application...”
- Select “card-service” and click “add” and “Finish”.
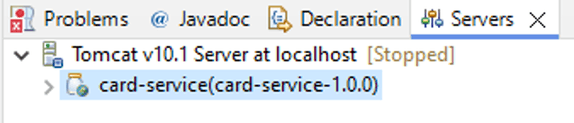
- Tomcat Server should contains “card-service” application:
- Click on the green icon “>”
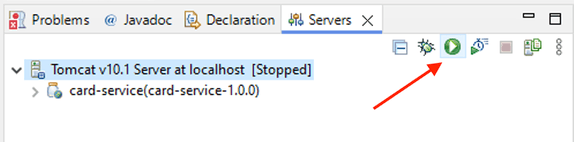
After Tomcat Server is started, the database “card” is initialized with tables from “bluesam”

Migrating VSAM datafiles into BLUESAM and initializing JICS
To migrate data please repeat the steps in AWS Transform for mainframe refactor certification training: https://catalog.workshops.aws/aws-blu-age-l3-certification-workshop/en-US/data-migration
- Once JICS and Bluesam data have been restored. Take a snapshot using RTS Manager.

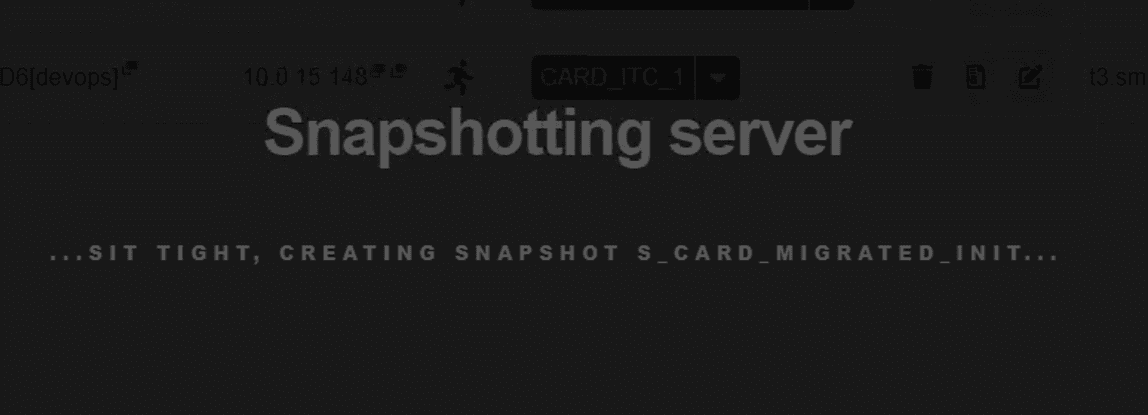
- Waiting page will be displayed. Then database will be set on new snapshot.

Once the snapshot is taken it can be used to come back to application initial state.
Running Angular front end application
In this section will start the application user interface in development mode using Visual Code.
Prerequisite
- Tomcat server must be started
Data migrated
Visual Code
- Launch Visual Code and open the folder (assuming git root is C:\dev\git):
C:\dev\git\gitlab-card-demo-modern-application\card-pom\card-web\angular
- Open a terminal window from the menu “Terminal” > “New window”.
- Execute the command line “npm start”. The application will compile in “development” mode and start a server listening on port 4200
- Open a web browser on http://localhost:4200
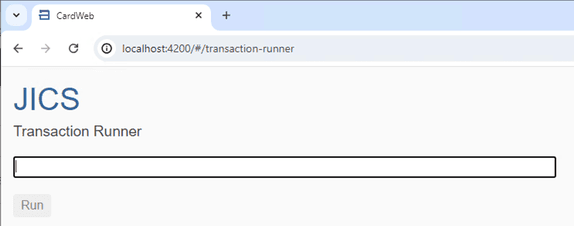
- Type in the transaction “CC00”

Complete instruction can be found here to test the modernized application.
- Online: https://catalog.workshops.aws/aws-blu-age-l3-certification-workshop/en-US/execution/test/online
- Batch: https://catalog.workshops.aws/aws-blu-age-l3-certification-workshop/en-US/execution/test/batch For the next step you can follow this guide on how to set up the CI/CD environment: AWS Blu Age DevOps Pipeline - Setup Guide