Compare UI
Introduction
Blu Age Compare Tool aims at comparing files and database tables, report comparison result and help to find discrepancies. It is meant to be lightweight and efficient. It uses configurations files in json format.
In order to better handle these configuration files, UI eclipse plugins were designed. They give you the following capabilities:
- Compare project creation
- Compare file creation
- Compare file editor
- Launch the compare tool from within the eclipse and gather the logs
This is completely optional. The compare tool does not need the UI to work.
Installation
Prerequisites
- Having an Eclipse installed (Version 2024-06 or above recommended).
- Java 17 needs to be installed.
- Download Compare Tool from Blu Age Toolbox.
- You need to have minimal IAM policies on your account to download the Compare Tool UI archive from S3 bucket. In case you don't have policies, then create one with the below information.
{
    "Version": "2012-10-17",
    "Statement": [
        {
            "Effect": "Allow",
            "Action": [
                "s3:ListBucket"
            ],
            "Resource": [
                "arn:aws:s3:::toolbox-compare-tool"
            ]
        },
        {
            "Effect": "Allow",
            "Action": [
                "s3:GetObject"
            ],
            "Resource": [
                "arn:aws:s3:::toolbox-compare-tool/*"
            ]
        }
    ]
  }
The Compare Tool executable needs to have the rights to use ports on your local network.
Step-by-step Guide
The compare tool UI is designed as a simple Eclipse plugin, which can be installed in an Eclipse with minimum requirements (a json editor is the only relevant condition).
- Download the archive com.netfective.bluage.compare.ui.updatesite.zip from the Compare Tool S3 bucket (
s3://toolbox-compare-tool/ui/). - In Eclipse go to Help > Install New Software
- Click on "Add" and "Archive", then select the archive you downloaded
- Give a name to this plugin, for instance "Compare Tool UI" and then click "Add"
- Select Blu Age Compare Feature and Click "Next"
- Click "Next", accept the license agreement and click on "Finish"
After Installation
In order to launch the configurations from within the Eclipse, The UI plugin needs to know the location of the Compare Tool.
If you added the CompareTool.exe location in your Windows PATH variable, it will be used without further setup. Otherwise, there is an Eclipse preference to set this up.
Click Window > Preferences, then you will have a Blu Age Compare tool preference:
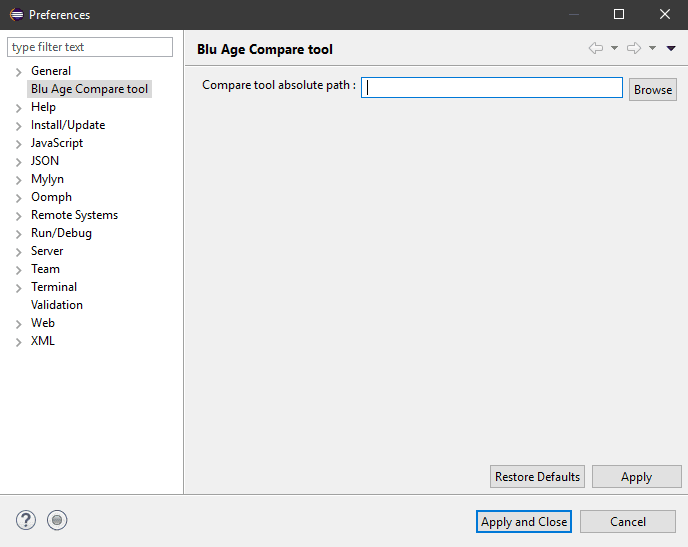
If both the preference and the PATH variable are set, the preference is used.
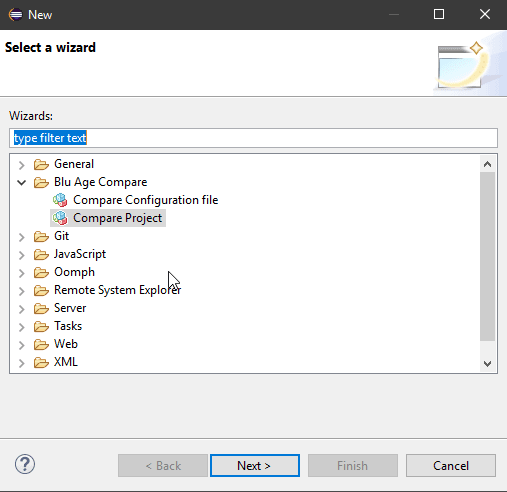
Compare Wizards
Two wizards are available in the UI. One to create a compare project, the other to create a single compare configuration file. Both are located in:
File > New > Other > Blu Age Compare
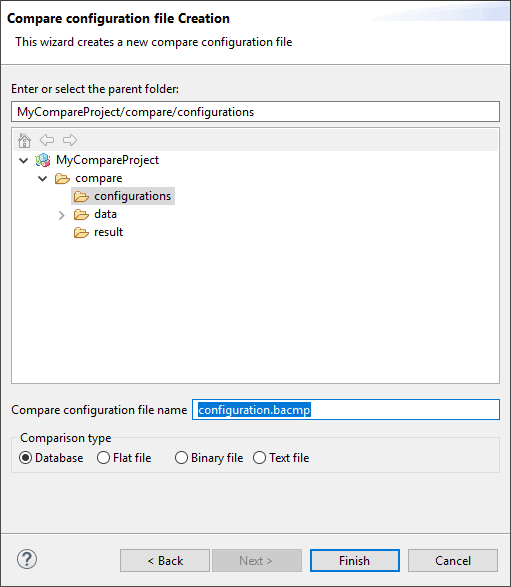
Compare Project Creation Wizard
The project creation wizard enables to create a compare project. Checkboxes are available to choose the comparison type. At least one of them must be checked. Please note that the "Binary file" mode is disregarded in this document.
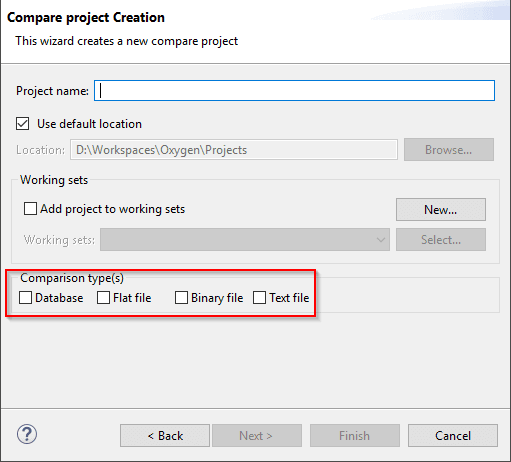
When checked, the checkboxes will lead to the creation of a project as described in the Compare Tool documentation and shown above.
If "Database" was checked, the following are created:
- A data/db/queries folder
- A data/db/presql folder
- A configurations/database.bacmp file
If "Flat file" was checked, the following are created:
- A data/flatfile/left folder
- A data/flatfile/right folder
- A configurations/flatfile.bacmp file
If "Text file" was checked, the following are created:
- A data/text/left folder
- A data/text/right folder
- A configurations/text.bacmp file
Configuration File Creation Wizard
If a new configuration file must be created in an already existing project, the second wizard can be used. It contains a radio button that must be set to one of the available modes to create an appropriate configuration file.
Compare Editor
When double-clicking on a bacmp file, it will open the Compare Configuration editor
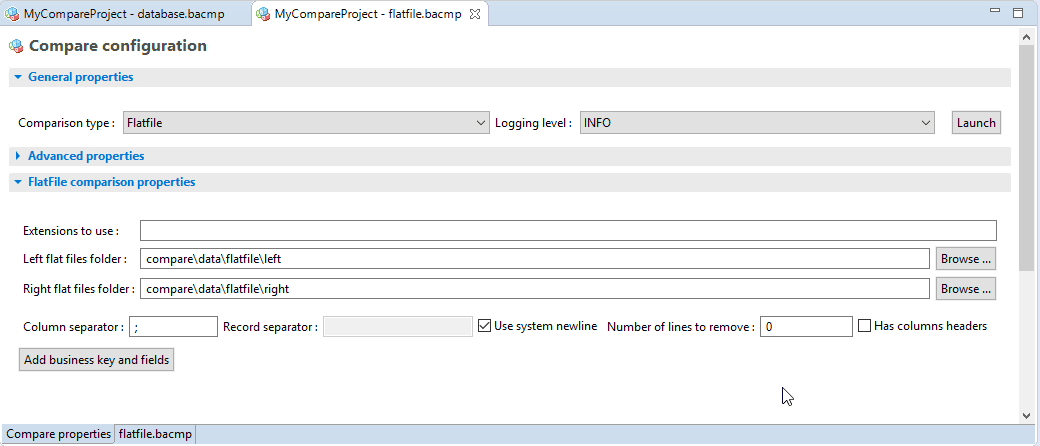
With the tabs at the bottom, you can switch from a user-friendly editor to a textual editor (which really is the eclipse json editor).
If another editor opens, you have to right-click on your file, then Open With > Blu Age comparator Editor
Main Structure and Default Values Management
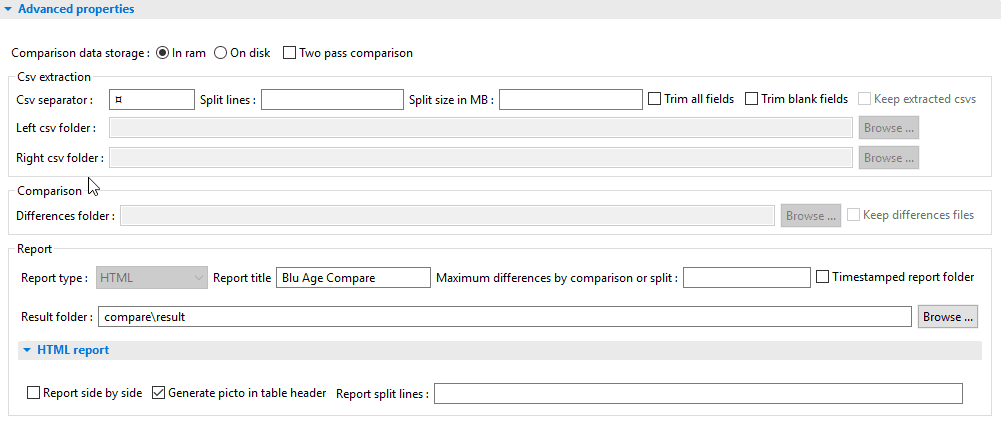
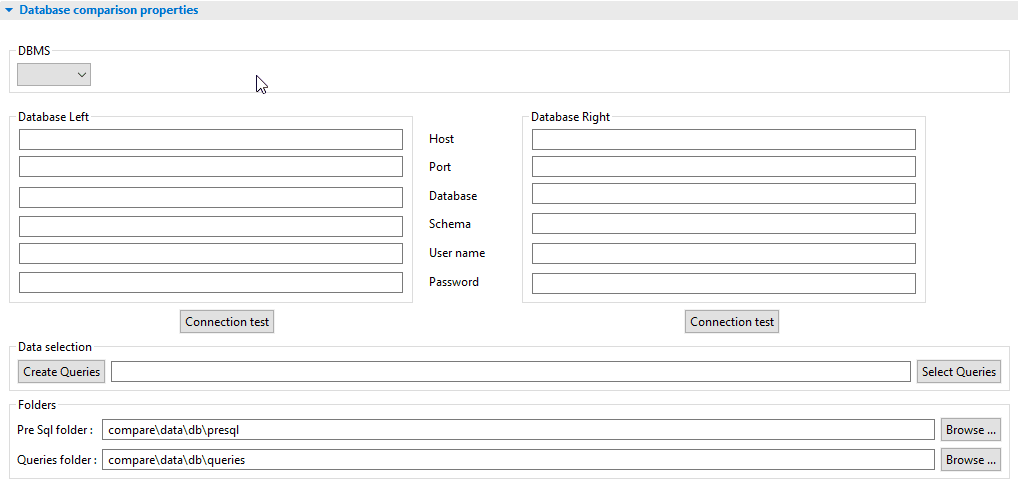
The editor has four parts:
- General properties
- Advanced properties (folded by default)
- Database comparison properties (shown only if "Database" is selected)
- Textfile comparison properties (shown only if "Textfile" is selected)
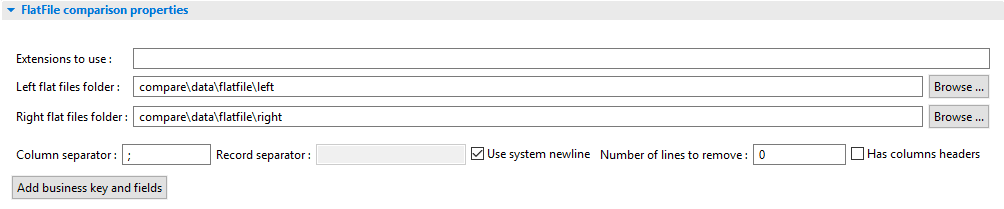
- FlatFile comparison properties (shown only if "Flatfile" is selected)
- Binary comparison properties (this mode is disregarded in this document)

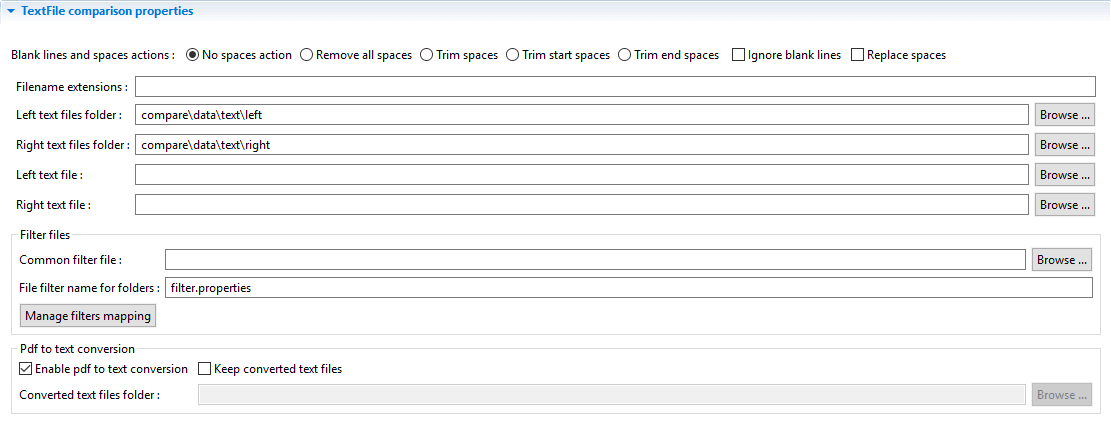
The editor will display the values as they appear in the underlying file, or the default values if available. This way, the editor appears “full” while the underlying file is much emptier. For instance, in the above screenshot, the "Left flat files folder", "Right flat files folder", etc. have their default values. The underlying file is this one:
{"comparisonType": "Flatfile"}
All the other values are displayed by default, and values will be written in the file only if you change the value to something different from the default.
Please see the CompareTool.docx document for the list of all fields and their default values.
Additional Wizards
To ease setup, some additional wizards are supplied through buttons in the editor.
- Connection test (Database section)
- Create queries (Database section)
- Select queries (Database section)
- Add business key and fields (FlatFile section)
- Manage filters mapping (Textfile section)
All but the "Select queries" and the "Manage filters mapping" wizards require the CompareTool.exe to be available and correctly setup (see After Installation) in order to work, since they will get their answers from the exe.
Connection Test
After populating the fields for the database connection, use "Connection test" to check your setup. The wizard will simply display a pop-up stating that the connection was successful or not. It will also log the same in the console.
Create Queries
After populating the fields for the database connection, use "Create queries" to create your SQL query files. The wizard will scan the tables in the databases and enable you to choose the tables you want, the columns you want and which are business keys.
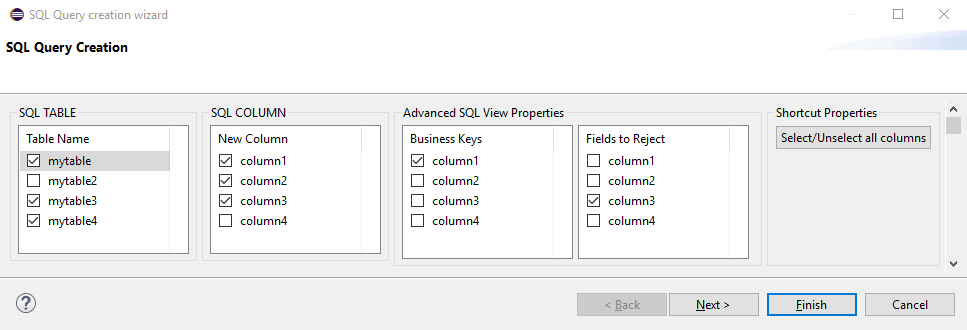
In the above example, a SQL query file will be created for mytable, mytable3 and mytable4. For mytable (the one that is highlighted), column4 is not used, column1 is a business key and column3 is rejected.
The generated file for mytable will be as follows:
SELECT column1,
  column2,
  '(REJECT)' as column3
  FROM mytable
  ;
  -- Business_key:column1;
Two other files were created for mytable3 and mytable4.
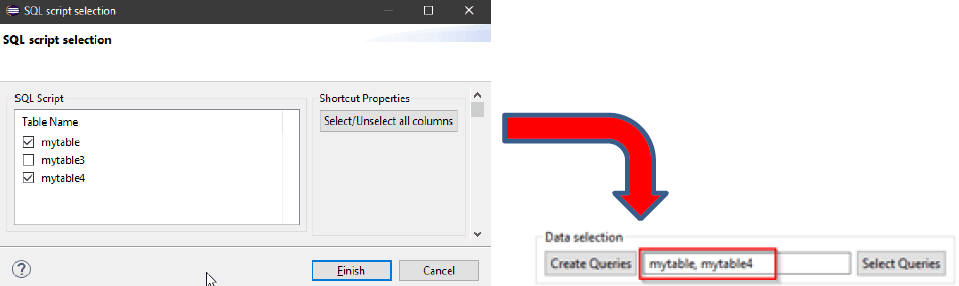
Select Queries
This wizard enables to select and unselect query files available in the queries folder, for actual comparison. For instance, in the above example, one now wants to include the script file for mytable and mytable4 in the comparison, but not mytable3.
Add Business Key and Fields
This wizard enables you to scan your files to be compared, select columns to set as business keys, columns to reject and columns to remove. It will use column headers if available, or present the data as column1, column2,...
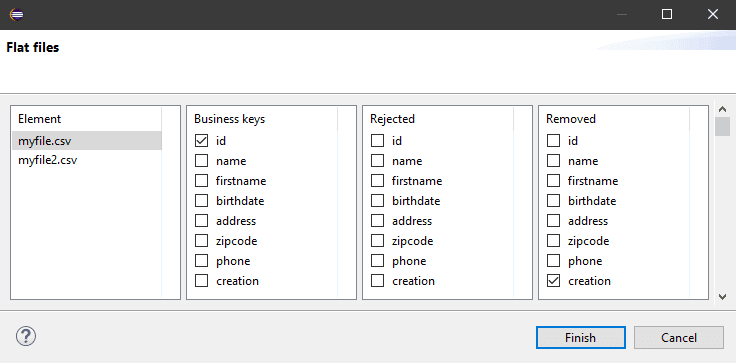
In the above example, for myfile.csv, headers are used. The "id" field is selected as a business key, and the "creation" field is excluded from comparison.
Manage Filters Mapping
This wizard enables you to add explicit associations between files to be compared and filter files containing regular expressions.
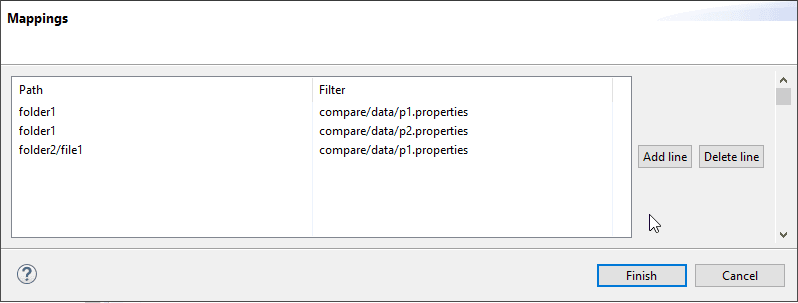
In the above example, for all files in folder1, p1.properties and p2.properties are used, and for the file folder2/file1, p1.properties is used. This corresponds to the textual configuration shown in the Compare Tool documentation.
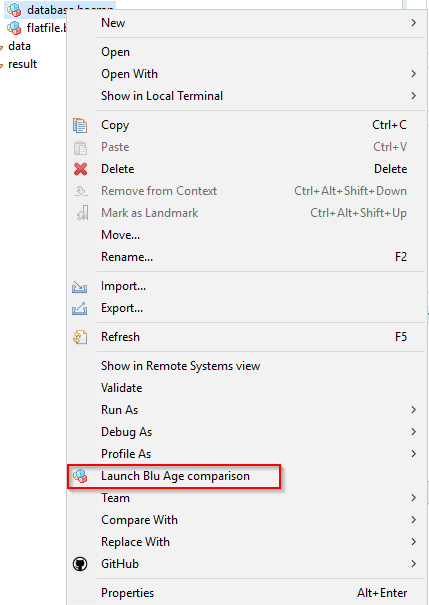
Launching
Once all is setup, you have two ways to launch the compare with the configuration.
Either use the Launch button in the editor:

Or use the contextual menu in the browser: